

Lee Valley - Square Hole Punches (Rating: 5)
![Image]()
This is a review of the Veritas Square Hole Punch, available individually or as a set of six, ranging in size from 3/16" to 1/2" by sixteenths. These punches are most often used for period work such as Greene and Greene style pieces where a raised plug is inserted, or for decorative pierced work (like the ones in my pictures) or for small square mortices. You could also use them as the beginning of much deeper mortises, using the perfect opening created as your guide for further drill and chisel work.
![Image]()
I recently used these in four sizes to cut over 100 holes for two upcoming projects and so offer my considered assessment. I learned a great deal about their use.
To begin with, the accuracy of these is beyond compare. For high quality production items you really can't beat Veritas's work. All the punches in my set were perfectly square and sized to within .002! 3/8" is exactly 3/8". The fit and finish of all parts of the tool were exemplary. The points were real pointy and the curved cutting surfaces were razor sharp. Diamond hones are available (cheap!) for sharpening (best done in a drill press with a perpendicular wood block holder).
![Image]()
In use the routine is as follows. Drill a hole 3/64ths smaller than the given size, invert the drill in the hole (as the shank will give a more accurate registration than the flutes), position the cutter over the drill, square it up, press the points into the wood with your finger tips, remove the drill and hammer the punch down to a maximum of 3/8". Remove the punch and clean the hole with a chisel as there is quite a bit of muff left at the bottom.
![Image]()
If you only have a few to do it's not hard, it's just careful work. If you have many to do, you will get into an easy rhythm. If the holes are anywhere near each other it is recommended that you clamp a straightedge to work to on the run of holes, as the slight tolerances that are always inherent, if run opposite each other, will yield visibly offset holes.
![Image]()
Some caveats.
The punch will be very difficult to withdraw in most hard woods. A light touch with a paraffin stick on the sides of the punch will help a lot.
The smaller sizes go in easily but the larger sizes will require quite a bit of force. Remember, you are chopping four sides of a mortice at once.
The real drawback to using the larger sizes is that you are trying to hammer a cylinder straight down with a bell faced tool. I don't care how many years you've been swinging a hammer on light or heavy work, it can't be done. Every blow lands slightly to one side or other of the cylinder and knocks it off square to the work. And when the punch enters other than dead square your sides will be curved.
![Image]()
Having said that, a choked up hold with real concentration and firm blows works best.
Here are three possible solutions to the problem.
Cut a rebated block to hold the punch upright. This works best with the smaller sizes.
![Image]()
![Image]()
Drill a slip fit hole in a block to contain the punch. This works ok but you cannot check your depth and things bounce around a bit as you cannot steady the tool with your hand.
![Image]()
Insert a carriage or stove bolt with filed off corners into the punch top. Now you have convex meeting the convex of your hammer and all is well. Combined with a rebated block, it will yield the most satisfying results.
![Image]()
![Image]()
These are beautiful tools, pricey but well worth the money if you have the application and want perfection. My only complaint is that for the set at $129, cheapskate Lee Valley doesn't even provide a pouch, much less a fitted plastic box. But we're woodworkers no? Boxes are what we do for fun.
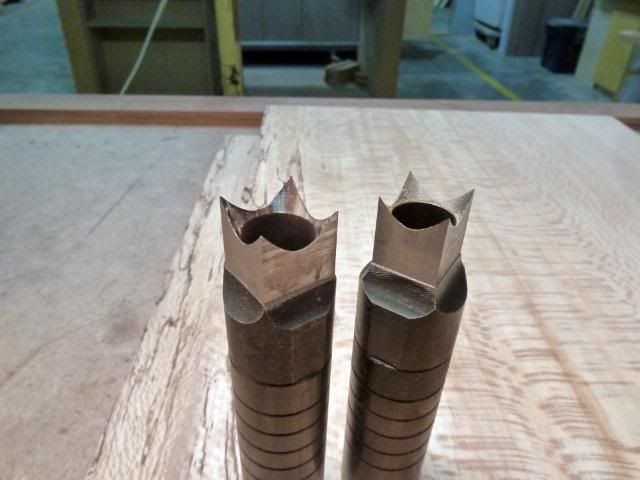
This is a review of the Veritas Square Hole Punch, available individually or as a set of six, ranging in size from 3/16" to 1/2" by sixteenths. These punches are most often used for period work such as Greene and Greene style pieces where a raised plug is inserted, or for decorative pierced work (like the ones in my pictures) or for small square mortices. You could also use them as the beginning of much deeper mortises, using the perfect opening created as your guide for further drill and chisel work.

I recently used these in four sizes to cut over 100 holes for two upcoming projects and so offer my considered assessment. I learned a great deal about their use.
To begin with, the accuracy of these is beyond compare. For high quality production items you really can't beat Veritas's work. All the punches in my set were perfectly square and sized to within .002! 3/8" is exactly 3/8". The fit and finish of all parts of the tool were exemplary. The points were real pointy and the curved cutting surfaces were razor sharp. Diamond hones are available (cheap!) for sharpening (best done in a drill press with a perpendicular wood block holder).

In use the routine is as follows. Drill a hole 3/64ths smaller than the given size, invert the drill in the hole (as the shank will give a more accurate registration than the flutes), position the cutter over the drill, square it up, press the points into the wood with your finger tips, remove the drill and hammer the punch down to a maximum of 3/8". Remove the punch and clean the hole with a chisel as there is quite a bit of muff left at the bottom.

If you only have a few to do it's not hard, it's just careful work. If you have many to do, you will get into an easy rhythm. If the holes are anywhere near each other it is recommended that you clamp a straightedge to work to on the run of holes, as the slight tolerances that are always inherent, if run opposite each other, will yield visibly offset holes.

Some caveats.
The punch will be very difficult to withdraw in most hard woods. A light touch with a paraffin stick on the sides of the punch will help a lot.
The smaller sizes go in easily but the larger sizes will require quite a bit of force. Remember, you are chopping four sides of a mortice at once.
The real drawback to using the larger sizes is that you are trying to hammer a cylinder straight down with a bell faced tool. I don't care how many years you've been swinging a hammer on light or heavy work, it can't be done. Every blow lands slightly to one side or other of the cylinder and knocks it off square to the work. And when the punch enters other than dead square your sides will be curved.

Having said that, a choked up hold with real concentration and firm blows works best.
Here are three possible solutions to the problem.
Cut a rebated block to hold the punch upright. This works best with the smaller sizes.


Drill a slip fit hole in a block to contain the punch. This works ok but you cannot check your depth and things bounce around a bit as you cannot steady the tool with your hand.

Insert a carriage or stove bolt with filed off corners into the punch top. Now you have convex meeting the convex of your hammer and all is well. Combined with a rebated block, it will yield the most satisfying results.


These are beautiful tools, pricey but well worth the money if you have the application and want perfection. My only complaint is that for the set at $129, cheapskate Lee Valley doesn't even provide a pouch, much less a fitted plastic box. But we're woodworkers no? Boxes are what we do for fun.


