LumberJocks Woodworking Forum banner
61 - 80 of 113 Posts
Attaching Transom, Finding Planking Lumber and Copper Rivets

It's been a busy month for other things, but I've made some good progress on the boat. I've also managed to find some great planking lumber, with a great story behind it, which I'll write about a bit below.

But first, update on the transom which now completes the stern.

Image


The transom is attached to sternpost with 5 countersunk #10 bronze screws which are covered with matching cherry plugs. Later on, I'll epoxy in and cut the plugs off flush.

Image


And a shot of the whole keel and transom assembly.

Image


Planking Lumber

I've spent a lot of time researching planking lumber since I started this project. I've considered everything from Western Red, Atlantic and Northern Cedars, Cypress, Spanish Cedar and Larch. Teak and Mahogony.. far too costly. None of these species, except for Larch and Cypress maybe, grows anywhere near Central New York.

I was mostly settled on Western Red Cedar, as I can obtain it locally, until I came across an ad on craigslist listing "Larch Lumber for Sale". It turned out that the seller was an older gentleman who had bought the larch about 3-4 years ago. He had been planning to build a large boat with it for many years, since around 1950 or so as I recall. My father and I drove down to meet him, and sure enough, he had about 300bf of air dried 10"x16' larch perfectly stacked and stickered. He said he bought it from an Amish sawyer in southern New York, which would almost certainly make it Tamarack or American Larch. Larch is a conifer, almost like something between a cedar and pine and has a tough and waterproof quality to it. I've read you can build an a boat entirely from Larch including the keel, ribs, masts and planking.

We spent the entire morning with him and his wife, who are the friendliest and most interesting folks you could meet. He showed us his woodworking and stained glass shops and we talked about several of his projects including some canoes he had built. He showed us the plans to the boat that he recently decided he couldn't build. I'm sure it was hard for him to part with his planking and his project, but we talked about how we were both glad to see it going into a boat project.

We ended up driving back with about twice the amount of lumber I need for this project. Here's a shot of some of the boards I'll be using for planking.

Image


Copper Rivets

After finding my planking, I needed to settle on how to fasten them together and to the ribs. There are at least a few ways to do it including clenching, riveting and glue I suppose. I finally decided on rivets using copper nails and roves and bought them from Faering Design. They specifically sell fasteners and tools for boat builders. I also bought the Rove Set tool and Bucking Hammer from them so that I have the right tools for the job. I'll probably show more details on riveting in a future entry here.

Image


Materials List:

  • Larch Planking, Found through Craigslist, $150 (I figured half my cost here, since I'm only using some of it)
  • Copper Rivets and Roves, Faering Design, $175

Project Materials Summary:

  • Plans and Book: $60
  • Lofting Supplies: $47.88
  • Mold Supplies: $36
  • Strongback Lumber: $33
  • Transom Materials: $22
  • Stem and Knee: $47
  • Keelson, Keel, Skeg and Sternpost: $97
  • Silicon Bronze Hardware: $225
  • Larch Planking and Copper Rivets: $325

- Total Project Expenses so far: $892.88

Labor Hours Summary:

  • 5/29/09 - 6/8/09: Lofting - 12 Hours
  • 6/14/09 - 6/20/09: Building Molds: 5 Hours
  • 6/25/09 - 6/27/09: Building Strongback: 7.5 Hours
  • 6/30/09 - 7/13/09: Building Transom: 6 Hours
  • 7/14/09 - 7/20/09: Stem Lofting Detail: 3 Hours
  • 7/22/09 - 7/29/09: Stem and Knee Cutout: 4 Hours
  • 7/30/09 - 8/16/09: Keel, Keelson, Skeg and Sternpost: 21 Hours
  • 8/16/09 - 9/5/09: Attaching Transom: 3 Hours

- Total Project Labor Hours so far: 61.5 Hours
- Time since starting project: 122 days (3 months 30 days)
Really nice job. Can't wait to see the finished product. Enjoy.. Thanks for sharing.
 
Attaching Transom, Finding Planking Lumber and Copper Rivets

It's been a busy month for other things, but I've made some good progress on the boat. I've also managed to find some great planking lumber, with a great story behind it, which I'll write about a bit below.

But first, update on the transom which now completes the stern.

Image


The transom is attached to sternpost with 5 countersunk #10 bronze screws which are covered with matching cherry plugs. Later on, I'll epoxy in and cut the plugs off flush.

Image


And a shot of the whole keel and transom assembly.

Image


Planking Lumber

I've spent a lot of time researching planking lumber since I started this project. I've considered everything from Western Red, Atlantic and Northern Cedars, Cypress, Spanish Cedar and Larch. Teak and Mahogony.. far too costly. None of these species, except for Larch and Cypress maybe, grows anywhere near Central New York.

I was mostly settled on Western Red Cedar, as I can obtain it locally, until I came across an ad on craigslist listing "Larch Lumber for Sale". It turned out that the seller was an older gentleman who had bought the larch about 3-4 years ago. He had been planning to build a large boat with it for many years, since around 1950 or so as I recall. My father and I drove down to meet him, and sure enough, he had about 300bf of air dried 10"x16' larch perfectly stacked and stickered. He said he bought it from an Amish sawyer in southern New York, which would almost certainly make it Tamarack or American Larch. Larch is a conifer, almost like something between a cedar and pine and has a tough and waterproof quality to it. I've read you can build an a boat entirely from Larch including the keel, ribs, masts and planking.

We spent the entire morning with him and his wife, who are the friendliest and most interesting folks you could meet. He showed us his woodworking and stained glass shops and we talked about several of his projects including some canoes he had built. He showed us the plans to the boat that he recently decided he couldn't build. I'm sure it was hard for him to part with his planking and his project, but we talked about how we were both glad to see it going into a boat project.

We ended up driving back with about twice the amount of lumber I need for this project. Here's a shot of some of the boards I'll be using for planking.

Image


Copper Rivets

After finding my planking, I needed to settle on how to fasten them together and to the ribs. There are at least a few ways to do it including clenching, riveting and glue I suppose. I finally decided on rivets using copper nails and roves and bought them from Faering Design. They specifically sell fasteners and tools for boat builders. I also bought the Rove Set tool and Bucking Hammer from them so that I have the right tools for the job. I'll probably show more details on riveting in a future entry here.

Image


Materials List:

  • Larch Planking, Found through Craigslist, $150 (I figured half my cost here, since I'm only using some of it)
  • Copper Rivets and Roves, Faering Design, $175

Project Materials Summary:

  • Plans and Book: $60
  • Lofting Supplies: $47.88
  • Mold Supplies: $36
  • Strongback Lumber: $33
  • Transom Materials: $22
  • Stem and Knee: $47
  • Keelson, Keel, Skeg and Sternpost: $97
  • Silicon Bronze Hardware: $225
  • Larch Planking and Copper Rivets: $325

- Total Project Expenses so far: $892.88

Labor Hours Summary:

  • 5/29/09 - 6/8/09: Lofting - 12 Hours
  • 6/14/09 - 6/20/09: Building Molds: 5 Hours
  • 6/25/09 - 6/27/09: Building Strongback: 7.5 Hours
  • 6/30/09 - 7/13/09: Building Transom: 6 Hours
  • 7/14/09 - 7/20/09: Stem Lofting Detail: 3 Hours
  • 7/22/09 - 7/29/09: Stem and Knee Cutout: 4 Hours
  • 7/30/09 - 8/16/09: Keel, Keelson, Skeg and Sternpost: 21 Hours
  • 8/16/09 - 9/5/09: Attaching Transom: 3 Hours

- Total Project Labor Hours so far: 61.5 Hours
- Time since starting project: 122 days (3 months 30 days)
great deal on the wood and I think it is reallly cool that you bought it from a gentleman who could not finish his own…there is some good karma there…

maybe name the boat after him…or just call it Karma…lol…

keep enjoying the process…I know I am from here…
 
Attaching Transom, Finding Planking Lumber and Copper Rivets

It's been a busy month for other things, but I've made some good progress on the boat. I've also managed to find some great planking lumber, with a great story behind it, which I'll write about a bit below.

But first, update on the transom which now completes the stern.

Image


The transom is attached to sternpost with 5 countersunk #10 bronze screws which are covered with matching cherry plugs. Later on, I'll epoxy in and cut the plugs off flush.

Image


And a shot of the whole keel and transom assembly.

Image


Planking Lumber

I've spent a lot of time researching planking lumber since I started this project. I've considered everything from Western Red, Atlantic and Northern Cedars, Cypress, Spanish Cedar and Larch. Teak and Mahogony.. far too costly. None of these species, except for Larch and Cypress maybe, grows anywhere near Central New York.

I was mostly settled on Western Red Cedar, as I can obtain it locally, until I came across an ad on craigslist listing "Larch Lumber for Sale". It turned out that the seller was an older gentleman who had bought the larch about 3-4 years ago. He had been planning to build a large boat with it for many years, since around 1950 or so as I recall. My father and I drove down to meet him, and sure enough, he had about 300bf of air dried 10"x16' larch perfectly stacked and stickered. He said he bought it from an Amish sawyer in southern New York, which would almost certainly make it Tamarack or American Larch. Larch is a conifer, almost like something between a cedar and pine and has a tough and waterproof quality to it. I've read you can build an a boat entirely from Larch including the keel, ribs, masts and planking.

We spent the entire morning with him and his wife, who are the friendliest and most interesting folks you could meet. He showed us his woodworking and stained glass shops and we talked about several of his projects including some canoes he had built. He showed us the plans to the boat that he recently decided he couldn't build. I'm sure it was hard for him to part with his planking and his project, but we talked about how we were both glad to see it going into a boat project.

We ended up driving back with about twice the amount of lumber I need for this project. Here's a shot of some of the boards I'll be using for planking.

Image


Copper Rivets

After finding my planking, I needed to settle on how to fasten them together and to the ribs. There are at least a few ways to do it including clenching, riveting and glue I suppose. I finally decided on rivets using copper nails and roves and bought them from Faering Design. They specifically sell fasteners and tools for boat builders. I also bought the Rove Set tool and Bucking Hammer from them so that I have the right tools for the job. I'll probably show more details on riveting in a future entry here.

Image


Materials List:

  • Larch Planking, Found through Craigslist, $150 (I figured half my cost here, since I'm only using some of it)
  • Copper Rivets and Roves, Faering Design, $175

Project Materials Summary:

  • Plans and Book: $60
  • Lofting Supplies: $47.88
  • Mold Supplies: $36
  • Strongback Lumber: $33
  • Transom Materials: $22
  • Stem and Knee: $47
  • Keelson, Keel, Skeg and Sternpost: $97
  • Silicon Bronze Hardware: $225
  • Larch Planking and Copper Rivets: $325

- Total Project Expenses so far: $892.88

Labor Hours Summary:

  • 5/29/09 - 6/8/09: Lofting - 12 Hours
  • 6/14/09 - 6/20/09: Building Molds: 5 Hours
  • 6/25/09 - 6/27/09: Building Strongback: 7.5 Hours
  • 6/30/09 - 7/13/09: Building Transom: 6 Hours
  • 7/14/09 - 7/20/09: Stem Lofting Detail: 3 Hours
  • 7/22/09 - 7/29/09: Stem and Knee Cutout: 4 Hours
  • 7/30/09 - 8/16/09: Keel, Keelson, Skeg and Sternpost: 21 Hours
  • 8/16/09 - 9/5/09: Attaching Transom: 3 Hours

- Total Project Labor Hours so far: 61.5 Hours
- Time since starting project: 122 days (3 months 30 days)
Great project and great blog. It will be fun to watch your progress. I helped my son build a terrace deck from Larch last fall. It was recommended for it's ability to withstand rot, and it seems pretty strong too. (it's called Lerke here in Norway)
 
Attaching Transom, Finding Planking Lumber and Copper Rivets

It's been a busy month for other things, but I've made some good progress on the boat. I've also managed to find some great planking lumber, with a great story behind it, which I'll write about a bit below.

But first, update on the transom which now completes the stern.

Image


The transom is attached to sternpost with 5 countersunk #10 bronze screws which are covered with matching cherry plugs. Later on, I'll epoxy in and cut the plugs off flush.

Image


And a shot of the whole keel and transom assembly.

Image


Planking Lumber

I've spent a lot of time researching planking lumber since I started this project. I've considered everything from Western Red, Atlantic and Northern Cedars, Cypress, Spanish Cedar and Larch. Teak and Mahogony.. far too costly. None of these species, except for Larch and Cypress maybe, grows anywhere near Central New York.

I was mostly settled on Western Red Cedar, as I can obtain it locally, until I came across an ad on craigslist listing "Larch Lumber for Sale". It turned out that the seller was an older gentleman who had bought the larch about 3-4 years ago. He had been planning to build a large boat with it for many years, since around 1950 or so as I recall. My father and I drove down to meet him, and sure enough, he had about 300bf of air dried 10"x16' larch perfectly stacked and stickered. He said he bought it from an Amish sawyer in southern New York, which would almost certainly make it Tamarack or American Larch. Larch is a conifer, almost like something between a cedar and pine and has a tough and waterproof quality to it. I've read you can build an a boat entirely from Larch including the keel, ribs, masts and planking.

We spent the entire morning with him and his wife, who are the friendliest and most interesting folks you could meet. He showed us his woodworking and stained glass shops and we talked about several of his projects including some canoes he had built. He showed us the plans to the boat that he recently decided he couldn't build. I'm sure it was hard for him to part with his planking and his project, but we talked about how we were both glad to see it going into a boat project.

We ended up driving back with about twice the amount of lumber I need for this project. Here's a shot of some of the boards I'll be using for planking.

Image


Copper Rivets

After finding my planking, I needed to settle on how to fasten them together and to the ribs. There are at least a few ways to do it including clenching, riveting and glue I suppose. I finally decided on rivets using copper nails and roves and bought them from Faering Design. They specifically sell fasteners and tools for boat builders. I also bought the Rove Set tool and Bucking Hammer from them so that I have the right tools for the job. I'll probably show more details on riveting in a future entry here.

Image


Materials List:

  • Larch Planking, Found through Craigslist, $150 (I figured half my cost here, since I'm only using some of it)
  • Copper Rivets and Roves, Faering Design, $175

Project Materials Summary:

  • Plans and Book: $60
  • Lofting Supplies: $47.88
  • Mold Supplies: $36
  • Strongback Lumber: $33
  • Transom Materials: $22
  • Stem and Knee: $47
  • Keelson, Keel, Skeg and Sternpost: $97
  • Silicon Bronze Hardware: $225
  • Larch Planking and Copper Rivets: $325

- Total Project Expenses so far: $892.88

Labor Hours Summary:

  • 5/29/09 - 6/8/09: Lofting - 12 Hours
  • 6/14/09 - 6/20/09: Building Molds: 5 Hours
  • 6/25/09 - 6/27/09: Building Strongback: 7.5 Hours
  • 6/30/09 - 7/13/09: Building Transom: 6 Hours
  • 7/14/09 - 7/20/09: Stem Lofting Detail: 3 Hours
  • 7/22/09 - 7/29/09: Stem and Knee Cutout: 4 Hours
  • 7/30/09 - 8/16/09: Keel, Keelson, Skeg and Sternpost: 21 Hours
  • 8/16/09 - 9/5/09: Attaching Transom: 3 Hours

- Total Project Labor Hours so far: 61.5 Hours
- Time since starting project: 122 days (3 months 30 days)
Hey Matt,
Starting to come along real nice….take your time…..measure twice….cut once.
 
Attaching Transom, Finding Planking Lumber and Copper Rivets

It's been a busy month for other things, but I've made some good progress on the boat. I've also managed to find some great planking lumber, with a great story behind it, which I'll write about a bit below.

But first, update on the transom which now completes the stern.

Image


The transom is attached to sternpost with 5 countersunk #10 bronze screws which are covered with matching cherry plugs. Later on, I'll epoxy in and cut the plugs off flush.

Image


And a shot of the whole keel and transom assembly.

Image


Planking Lumber

I've spent a lot of time researching planking lumber since I started this project. I've considered everything from Western Red, Atlantic and Northern Cedars, Cypress, Spanish Cedar and Larch. Teak and Mahogony.. far too costly. None of these species, except for Larch and Cypress maybe, grows anywhere near Central New York.

I was mostly settled on Western Red Cedar, as I can obtain it locally, until I came across an ad on craigslist listing "Larch Lumber for Sale". It turned out that the seller was an older gentleman who had bought the larch about 3-4 years ago. He had been planning to build a large boat with it for many years, since around 1950 or so as I recall. My father and I drove down to meet him, and sure enough, he had about 300bf of air dried 10"x16' larch perfectly stacked and stickered. He said he bought it from an Amish sawyer in southern New York, which would almost certainly make it Tamarack or American Larch. Larch is a conifer, almost like something between a cedar and pine and has a tough and waterproof quality to it. I've read you can build an a boat entirely from Larch including the keel, ribs, masts and planking.

We spent the entire morning with him and his wife, who are the friendliest and most interesting folks you could meet. He showed us his woodworking and stained glass shops and we talked about several of his projects including some canoes he had built. He showed us the plans to the boat that he recently decided he couldn't build. I'm sure it was hard for him to part with his planking and his project, but we talked about how we were both glad to see it going into a boat project.

We ended up driving back with about twice the amount of lumber I need for this project. Here's a shot of some of the boards I'll be using for planking.

Image


Copper Rivets

After finding my planking, I needed to settle on how to fasten them together and to the ribs. There are at least a few ways to do it including clenching, riveting and glue I suppose. I finally decided on rivets using copper nails and roves and bought them from Faering Design. They specifically sell fasteners and tools for boat builders. I also bought the Rove Set tool and Bucking Hammer from them so that I have the right tools for the job. I'll probably show more details on riveting in a future entry here.

Image


Materials List:

  • Larch Planking, Found through Craigslist, $150 (I figured half my cost here, since I'm only using some of it)
  • Copper Rivets and Roves, Faering Design, $175

Project Materials Summary:

  • Plans and Book: $60
  • Lofting Supplies: $47.88
  • Mold Supplies: $36
  • Strongback Lumber: $33
  • Transom Materials: $22
  • Stem and Knee: $47
  • Keelson, Keel, Skeg and Sternpost: $97
  • Silicon Bronze Hardware: $225
  • Larch Planking and Copper Rivets: $325

- Total Project Expenses so far: $892.88

Labor Hours Summary:

  • 5/29/09 - 6/8/09: Lofting - 12 Hours
  • 6/14/09 - 6/20/09: Building Molds: 5 Hours
  • 6/25/09 - 6/27/09: Building Strongback: 7.5 Hours
  • 6/30/09 - 7/13/09: Building Transom: 6 Hours
  • 7/14/09 - 7/20/09: Stem Lofting Detail: 3 Hours
  • 7/22/09 - 7/29/09: Stem and Knee Cutout: 4 Hours
  • 7/30/09 - 8/16/09: Keel, Keelson, Skeg and Sternpost: 21 Hours
  • 8/16/09 - 9/5/09: Attaching Transom: 3 Hours

- Total Project Labor Hours so far: 61.5 Hours
- Time since starting project: 122 days (3 months 30 days)
Going to be a nice boat!
 
Attaching Transom, Finding Planking Lumber and Copper Rivets

It's been a busy month for other things, but I've made some good progress on the boat. I've also managed to find some great planking lumber, with a great story behind it, which I'll write about a bit below.

But first, update on the transom which now completes the stern.

Image


The transom is attached to sternpost with 5 countersunk #10 bronze screws which are covered with matching cherry plugs. Later on, I'll epoxy in and cut the plugs off flush.

Image


And a shot of the whole keel and transom assembly.

Image


Planking Lumber

I've spent a lot of time researching planking lumber since I started this project. I've considered everything from Western Red, Atlantic and Northern Cedars, Cypress, Spanish Cedar and Larch. Teak and Mahogony.. far too costly. None of these species, except for Larch and Cypress maybe, grows anywhere near Central New York.

I was mostly settled on Western Red Cedar, as I can obtain it locally, until I came across an ad on craigslist listing "Larch Lumber for Sale". It turned out that the seller was an older gentleman who had bought the larch about 3-4 years ago. He had been planning to build a large boat with it for many years, since around 1950 or so as I recall. My father and I drove down to meet him, and sure enough, he had about 300bf of air dried 10"x16' larch perfectly stacked and stickered. He said he bought it from an Amish sawyer in southern New York, which would almost certainly make it Tamarack or American Larch. Larch is a conifer, almost like something between a cedar and pine and has a tough and waterproof quality to it. I've read you can build an a boat entirely from Larch including the keel, ribs, masts and planking.

We spent the entire morning with him and his wife, who are the friendliest and most interesting folks you could meet. He showed us his woodworking and stained glass shops and we talked about several of his projects including some canoes he had built. He showed us the plans to the boat that he recently decided he couldn't build. I'm sure it was hard for him to part with his planking and his project, but we talked about how we were both glad to see it going into a boat project.

We ended up driving back with about twice the amount of lumber I need for this project. Here's a shot of some of the boards I'll be using for planking.

Image


Copper Rivets

After finding my planking, I needed to settle on how to fasten them together and to the ribs. There are at least a few ways to do it including clenching, riveting and glue I suppose. I finally decided on rivets using copper nails and roves and bought them from Faering Design. They specifically sell fasteners and tools for boat builders. I also bought the Rove Set tool and Bucking Hammer from them so that I have the right tools for the job. I'll probably show more details on riveting in a future entry here.

Image


Materials List:

  • Larch Planking, Found through Craigslist, $150 (I figured half my cost here, since I'm only using some of it)
  • Copper Rivets and Roves, Faering Design, $175

Project Materials Summary:

  • Plans and Book: $60
  • Lofting Supplies: $47.88
  • Mold Supplies: $36
  • Strongback Lumber: $33
  • Transom Materials: $22
  • Stem and Knee: $47
  • Keelson, Keel, Skeg and Sternpost: $97
  • Silicon Bronze Hardware: $225
  • Larch Planking and Copper Rivets: $325

- Total Project Expenses so far: $892.88

Labor Hours Summary:

  • 5/29/09 - 6/8/09: Lofting - 12 Hours
  • 6/14/09 - 6/20/09: Building Molds: 5 Hours
  • 6/25/09 - 6/27/09: Building Strongback: 7.5 Hours
  • 6/30/09 - 7/13/09: Building Transom: 6 Hours
  • 7/14/09 - 7/20/09: Stem Lofting Detail: 3 Hours
  • 7/22/09 - 7/29/09: Stem and Knee Cutout: 4 Hours
  • 7/30/09 - 8/16/09: Keel, Keelson, Skeg and Sternpost: 21 Hours
  • 8/16/09 - 9/5/09: Attaching Transom: 3 Hours

- Total Project Labor Hours so far: 61.5 Hours
- Time since starting project: 122 days (3 months 30 days)
Question, did you bed the stern post to the transom with white lead? looks like you used it on the keel to keelson as well.
 
Discussion starter · #67 ·
Attaching Transom, Finding Planking Lumber and Copper Rivets

It's been a busy month for other things, but I've made some good progress on the boat. I've also managed to find some great planking lumber, with a great story behind it, which I'll write about a bit below.

But first, update on the transom which now completes the stern.

Image


The transom is attached to sternpost with 5 countersunk #10 bronze screws which are covered with matching cherry plugs. Later on, I'll epoxy in and cut the plugs off flush.

Image


And a shot of the whole keel and transom assembly.

Image


Planking Lumber

I've spent a lot of time researching planking lumber since I started this project. I've considered everything from Western Red, Atlantic and Northern Cedars, Cypress, Spanish Cedar and Larch. Teak and Mahogony.. far too costly. None of these species, except for Larch and Cypress maybe, grows anywhere near Central New York.

I was mostly settled on Western Red Cedar, as I can obtain it locally, until I came across an ad on craigslist listing "Larch Lumber for Sale". It turned out that the seller was an older gentleman who had bought the larch about 3-4 years ago. He had been planning to build a large boat with it for many years, since around 1950 or so as I recall. My father and I drove down to meet him, and sure enough, he had about 300bf of air dried 10"x16' larch perfectly stacked and stickered. He said he bought it from an Amish sawyer in southern New York, which would almost certainly make it Tamarack or American Larch. Larch is a conifer, almost like something between a cedar and pine and has a tough and waterproof quality to it. I've read you can build an a boat entirely from Larch including the keel, ribs, masts and planking.

We spent the entire morning with him and his wife, who are the friendliest and most interesting folks you could meet. He showed us his woodworking and stained glass shops and we talked about several of his projects including some canoes he had built. He showed us the plans to the boat that he recently decided he couldn't build. I'm sure it was hard for him to part with his planking and his project, but we talked about how we were both glad to see it going into a boat project.

We ended up driving back with about twice the amount of lumber I need for this project. Here's a shot of some of the boards I'll be using for planking.

Image


Copper Rivets

After finding my planking, I needed to settle on how to fasten them together and to the ribs. There are at least a few ways to do it including clenching, riveting and glue I suppose. I finally decided on rivets using copper nails and roves and bought them from Faering Design. They specifically sell fasteners and tools for boat builders. I also bought the Rove Set tool and Bucking Hammer from them so that I have the right tools for the job. I'll probably show more details on riveting in a future entry here.

Image


Materials List:

  • Larch Planking, Found through Craigslist, $150 (I figured half my cost here, since I'm only using some of it)
  • Copper Rivets and Roves, Faering Design, $175

Project Materials Summary:

  • Plans and Book: $60
  • Lofting Supplies: $47.88
  • Mold Supplies: $36
  • Strongback Lumber: $33
  • Transom Materials: $22
  • Stem and Knee: $47
  • Keelson, Keel, Skeg and Sternpost: $97
  • Silicon Bronze Hardware: $225
  • Larch Planking and Copper Rivets: $325

- Total Project Expenses so far: $892.88

Labor Hours Summary:

  • 5/29/09 - 6/8/09: Lofting - 12 Hours
  • 6/14/09 - 6/20/09: Building Molds: 5 Hours
  • 6/25/09 - 6/27/09: Building Strongback: 7.5 Hours
  • 6/30/09 - 7/13/09: Building Transom: 6 Hours
  • 7/14/09 - 7/20/09: Stem Lofting Detail: 3 Hours
  • 7/22/09 - 7/29/09: Stem and Knee Cutout: 4 Hours
  • 7/30/09 - 8/16/09: Keel, Keelson, Skeg and Sternpost: 21 Hours
  • 8/16/09 - 9/5/09: Attaching Transom: 3 Hours

- Total Project Labor Hours so far: 61.5 Hours
- Time since starting project: 122 days (3 months 30 days)
Thanks everyone for the great comments and suggestions.

Bruce - Great to meet up with another (future) Sunshine builder. I would be very interested in following your progress. Once you start lofting your first few lines, you won't be able to stop. Did you get the book too? I'd recommend it.

Napaman - Cool idea for naming the boat. I'm going to give that some thought.

Rusted Knuckles - I'm using Boatlife Life-Calk for the bedding in all joints. It goes on like thick tar. Ends up on everything.
 
Discussion starter · #68 ·
Attaching Transom, Finding Planking Lumber and Copper Rivets

It's been a busy month for other things, but I've made some good progress on the boat. I've also managed to find some great planking lumber, with a great story behind it, which I'll write about a bit below.

But first, update on the transom which now completes the stern.

Image


The transom is attached to sternpost with 5 countersunk #10 bronze screws which are covered with matching cherry plugs. Later on, I'll epoxy in and cut the plugs off flush.

Image


And a shot of the whole keel and transom assembly.

Image


Planking Lumber

I've spent a lot of time researching planking lumber since I started this project. I've considered everything from Western Red, Atlantic and Northern Cedars, Cypress, Spanish Cedar and Larch. Teak and Mahogony.. far too costly. None of these species, except for Larch and Cypress maybe, grows anywhere near Central New York.

I was mostly settled on Western Red Cedar, as I can obtain it locally, until I came across an ad on craigslist listing "Larch Lumber for Sale". It turned out that the seller was an older gentleman who had bought the larch about 3-4 years ago. He had been planning to build a large boat with it for many years, since around 1950 or so as I recall. My father and I drove down to meet him, and sure enough, he had about 300bf of air dried 10"x16' larch perfectly stacked and stickered. He said he bought it from an Amish sawyer in southern New York, which would almost certainly make it Tamarack or American Larch. Larch is a conifer, almost like something between a cedar and pine and has a tough and waterproof quality to it. I've read you can build an a boat entirely from Larch including the keel, ribs, masts and planking.

We spent the entire morning with him and his wife, who are the friendliest and most interesting folks you could meet. He showed us his woodworking and stained glass shops and we talked about several of his projects including some canoes he had built. He showed us the plans to the boat that he recently decided he couldn't build. I'm sure it was hard for him to part with his planking and his project, but we talked about how we were both glad to see it going into a boat project.

We ended up driving back with about twice the amount of lumber I need for this project. Here's a shot of some of the boards I'll be using for planking.

Image


Copper Rivets

After finding my planking, I needed to settle on how to fasten them together and to the ribs. There are at least a few ways to do it including clenching, riveting and glue I suppose. I finally decided on rivets using copper nails and roves and bought them from Faering Design. They specifically sell fasteners and tools for boat builders. I also bought the Rove Set tool and Bucking Hammer from them so that I have the right tools for the job. I'll probably show more details on riveting in a future entry here.

Image


Materials List:

  • Larch Planking, Found through Craigslist, $150 (I figured half my cost here, since I'm only using some of it)
  • Copper Rivets and Roves, Faering Design, $175

Project Materials Summary:

  • Plans and Book: $60
  • Lofting Supplies: $47.88
  • Mold Supplies: $36
  • Strongback Lumber: $33
  • Transom Materials: $22
  • Stem and Knee: $47
  • Keelson, Keel, Skeg and Sternpost: $97
  • Silicon Bronze Hardware: $225
  • Larch Planking and Copper Rivets: $325

- Total Project Expenses so far: $892.88

Labor Hours Summary:

  • 5/29/09 - 6/8/09: Lofting - 12 Hours
  • 6/14/09 - 6/20/09: Building Molds: 5 Hours
  • 6/25/09 - 6/27/09: Building Strongback: 7.5 Hours
  • 6/30/09 - 7/13/09: Building Transom: 6 Hours
  • 7/14/09 - 7/20/09: Stem Lofting Detail: 3 Hours
  • 7/22/09 - 7/29/09: Stem and Knee Cutout: 4 Hours
  • 7/30/09 - 8/16/09: Keel, Keelson, Skeg and Sternpost: 21 Hours
  • 8/16/09 - 9/5/09: Attaching Transom: 3 Hours

- Total Project Labor Hours so far: 61.5 Hours
- Time since starting project: 122 days (3 months 30 days)
DaveR - You know.. I've found 3M 5200 to be so "popular" with boat builders that I plan to coat the entire boat with it when I'm done. ;)
 
Attaching Transom, Finding Planking Lumber and Copper Rivets

It's been a busy month for other things, but I've made some good progress on the boat. I've also managed to find some great planking lumber, with a great story behind it, which I'll write about a bit below.

But first, update on the transom which now completes the stern.

Image


The transom is attached to sternpost with 5 countersunk #10 bronze screws which are covered with matching cherry plugs. Later on, I'll epoxy in and cut the plugs off flush.

Image


And a shot of the whole keel and transom assembly.

Image


Planking Lumber

I've spent a lot of time researching planking lumber since I started this project. I've considered everything from Western Red, Atlantic and Northern Cedars, Cypress, Spanish Cedar and Larch. Teak and Mahogony.. far too costly. None of these species, except for Larch and Cypress maybe, grows anywhere near Central New York.

I was mostly settled on Western Red Cedar, as I can obtain it locally, until I came across an ad on craigslist listing "Larch Lumber for Sale". It turned out that the seller was an older gentleman who had bought the larch about 3-4 years ago. He had been planning to build a large boat with it for many years, since around 1950 or so as I recall. My father and I drove down to meet him, and sure enough, he had about 300bf of air dried 10"x16' larch perfectly stacked and stickered. He said he bought it from an Amish sawyer in southern New York, which would almost certainly make it Tamarack or American Larch. Larch is a conifer, almost like something between a cedar and pine and has a tough and waterproof quality to it. I've read you can build an a boat entirely from Larch including the keel, ribs, masts and planking.

We spent the entire morning with him and his wife, who are the friendliest and most interesting folks you could meet. He showed us his woodworking and stained glass shops and we talked about several of his projects including some canoes he had built. He showed us the plans to the boat that he recently decided he couldn't build. I'm sure it was hard for him to part with his planking and his project, but we talked about how we were both glad to see it going into a boat project.

We ended up driving back with about twice the amount of lumber I need for this project. Here's a shot of some of the boards I'll be using for planking.

Image


Copper Rivets

After finding my planking, I needed to settle on how to fasten them together and to the ribs. There are at least a few ways to do it including clenching, riveting and glue I suppose. I finally decided on rivets using copper nails and roves and bought them from Faering Design. They specifically sell fasteners and tools for boat builders. I also bought the Rove Set tool and Bucking Hammer from them so that I have the right tools for the job. I'll probably show more details on riveting in a future entry here.

Image


Materials List:

  • Larch Planking, Found through Craigslist, $150 (I figured half my cost here, since I'm only using some of it)
  • Copper Rivets and Roves, Faering Design, $175

Project Materials Summary:

  • Plans and Book: $60
  • Lofting Supplies: $47.88
  • Mold Supplies: $36
  • Strongback Lumber: $33
  • Transom Materials: $22
  • Stem and Knee: $47
  • Keelson, Keel, Skeg and Sternpost: $97
  • Silicon Bronze Hardware: $225
  • Larch Planking and Copper Rivets: $325

- Total Project Expenses so far: $892.88

Labor Hours Summary:

  • 5/29/09 - 6/8/09: Lofting - 12 Hours
  • 6/14/09 - 6/20/09: Building Molds: 5 Hours
  • 6/25/09 - 6/27/09: Building Strongback: 7.5 Hours
  • 6/30/09 - 7/13/09: Building Transom: 6 Hours
  • 7/14/09 - 7/20/09: Stem Lofting Detail: 3 Hours
  • 7/22/09 - 7/29/09: Stem and Knee Cutout: 4 Hours
  • 7/30/09 - 8/16/09: Keel, Keelson, Skeg and Sternpost: 21 Hours
  • 8/16/09 - 9/5/09: Attaching Transom: 3 Hours

- Total Project Labor Hours so far: 61.5 Hours
- Time since starting project: 122 days (3 months 30 days)
Nice work .Will you be coating it with West System Epoxy?

Jim
 
Discussion starter · #70 ·
Cutting Stem and Keel Rabbet

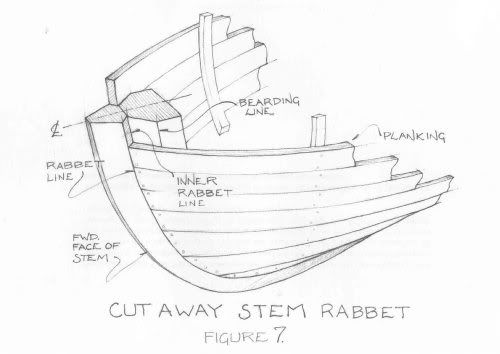
This next part is cutting the rabbet into the Keel and Stem. The rabbet is a groove for planking to butt into. The rabbet must be accurately cut in order to form a tight seal. The rabbet for sunshine runs down both sides of the stem as shown and continues along the keel to the stern.

Image


Keel Rabbet

Cutting the Rabbet in the Keel was relatively easy since I had already beveled the keelson from the lofted lines in the Stem and Knee - Part 2 section.

To me, it seemed practical to try a Stanley #90 shoulder plane, and use the angle on the keelson as a reference to cut a 90 degree "groove" into the keel so that the groove had a depth 3/8", which will be the plank thickness. I used a test 3/8" piece to test occasionally also. This method worked really well for me and seems better than chopping out.. but I've got plenty of chisel chopping ahead.

Image


After several hours, a nice rabbet on both sides of the keel.

Image


Stem Rabbet

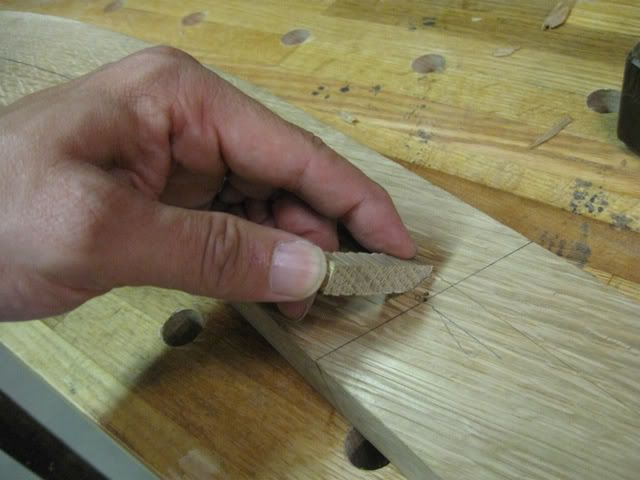
The stem was a little more challenging. At this point, I have to really trust my lofting skills which is where I'm getting all the angles for cutting the rabbet. The rolling bevels in the stem are wild compared to the gradual changes in the keel. Although I checked everything 4 times, there's a lot of time into the stem already and I don't want to ruin it! First step is to get the bearding and rabbet lines from the lofting onto the actual stem. The rabbet line is easy, since it's a fixed distance from the edge of the stem, so I just used a marking tool referenced off the stem edge. The bearding line however is a weird curve. I transfered the bearding line from the lofting onto the templates that I made earlier for cutting out the stem. I then drilled several small holes along these lines on the template so that I could lay the template on the actual stem and draw marks through the holes. Using the template is nice this way, since I could just flip it over and make matching marks on boths sides of the stem. I should point out that the curve for the bearding and rabbet lines were originally determined from the lofting drawing. This is explained further in Stem and Knee - Part 1

Image


With the lines transferred, I then cut a series of notches along the stem with chisels and then removed the waste between the notches. It's very nice to be able to do this on the bench instead of working on it vertically in the mold.

Image


The angles of the cuts are tested with a 3/8" template to ensure that the planking fits correctly at each point in the stem.

Image


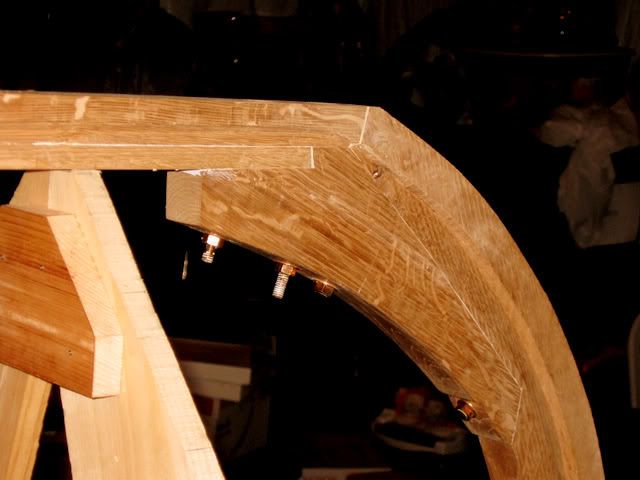
Completed stem rabbet!

Image


And a shot of the whole thing.

Image


Finally, a close up of the intersection between the Stem and Keel. The rabbet still needs to be cut here so that there is a smooth transition. I have to wait at least a few days for the bedding compound to dry, otherwise, I'll be working with a big tar-like ball of shavings.

Image


Materials List:

None for this step!

Project Materials Summary:

  • Plans and Book: $60
  • Lofting Supplies: $47.88
  • Mold Supplies: $36
  • Strongback Lumber: $33
  • Transom Materials: $22
  • Stem and Knee: $47
  • Keelson, Keel, Skeg and Sternpost: $97
  • Silicon Bronze Hardware: $225
  • Larch Planking and Copper Rivets: $325

- Total Project Expenses so far: $892.88

Labor Hours Summary:

  • 5/29/09 - 6/8/09: Lofting - 12 Hours
  • 6/14/09 - 6/20/09: Building Molds: 5 Hours
  • 6/25/09 - 6/27/09: Building Strongback: 7.5 Hours
  • 6/30/09 - 7/13/09: Building Transom: 6 Hours
  • 7/14/09 - 7/20/09: Stem Lofting Detail: 3 Hours
  • 7/22/09 - 7/29/09: Stem and Knee Cutout: 4 Hours
  • 7/30/09 - 8/16/09: Keel, Keelson, Skeg and Sternpost: 21 Hours
  • 8/16/09 - 9/5/09: Attaching Transom: 3 Hours
  • 9/28/09 - 9/29/09: Cutting Stem and Keel Rabbet, 9 Hours

- Total Project Labor Hours so far: 70.5 Hours
- Time since starting project: 123 days (3 months 31 days)
looks real nice , matt .

one of the things we learn in woodworking ,
is patience !
it is essential for fine work .

and it transfers into our lives ,
and helps us be better people .
 
Cutting Stem and Keel Rabbet

This next part is cutting the rabbet into the Keel and Stem. The rabbet is a groove for planking to butt into. The rabbet must be accurately cut in order to form a tight seal. The rabbet for sunshine runs down both sides of the stem as shown and continues along the keel to the stern.

Image


Keel Rabbet

Cutting the Rabbet in the Keel was relatively easy since I had already beveled the keelson from the lofted lines in the Stem and Knee - Part 2 section.

To me, it seemed practical to try a Stanley #90 shoulder plane, and use the angle on the keelson as a reference to cut a 90 degree "groove" into the keel so that the groove had a depth 3/8", which will be the plank thickness. I used a test 3/8" piece to test occasionally also. This method worked really well for me and seems better than chopping out.. but I've got plenty of chisel chopping ahead.

Image


After several hours, a nice rabbet on both sides of the keel.

Image


Stem Rabbet

The stem was a little more challenging. At this point, I have to really trust my lofting skills which is where I'm getting all the angles for cutting the rabbet. The rolling bevels in the stem are wild compared to the gradual changes in the keel. Although I checked everything 4 times, there's a lot of time into the stem already and I don't want to ruin it! First step is to get the bearding and rabbet lines from the lofting onto the actual stem. The rabbet line is easy, since it's a fixed distance from the edge of the stem, so I just used a marking tool referenced off the stem edge. The bearding line however is a weird curve. I transfered the bearding line from the lofting onto the templates that I made earlier for cutting out the stem. I then drilled several small holes along these lines on the template so that I could lay the template on the actual stem and draw marks through the holes. Using the template is nice this way, since I could just flip it over and make matching marks on boths sides of the stem. I should point out that the curve for the bearding and rabbet lines were originally determined from the lofting drawing. This is explained further in Stem and Knee - Part 1

Image


With the lines transferred, I then cut a series of notches along the stem with chisels and then removed the waste between the notches. It's very nice to be able to do this on the bench instead of working on it vertically in the mold.

Image


The angles of the cuts are tested with a 3/8" template to ensure that the planking fits correctly at each point in the stem.

Image


Completed stem rabbet!

Image


And a shot of the whole thing.

Image


Finally, a close up of the intersection between the Stem and Keel. The rabbet still needs to be cut here so that there is a smooth transition. I have to wait at least a few days for the bedding compound to dry, otherwise, I'll be working with a big tar-like ball of shavings.

Image


Materials List:

None for this step!

Project Materials Summary:

  • Plans and Book: $60
  • Lofting Supplies: $47.88
  • Mold Supplies: $36
  • Strongback Lumber: $33
  • Transom Materials: $22
  • Stem and Knee: $47
  • Keelson, Keel, Skeg and Sternpost: $97
  • Silicon Bronze Hardware: $225
  • Larch Planking and Copper Rivets: $325

- Total Project Expenses so far: $892.88

Labor Hours Summary:

  • 5/29/09 - 6/8/09: Lofting - 12 Hours
  • 6/14/09 - 6/20/09: Building Molds: 5 Hours
  • 6/25/09 - 6/27/09: Building Strongback: 7.5 Hours
  • 6/30/09 - 7/13/09: Building Transom: 6 Hours
  • 7/14/09 - 7/20/09: Stem Lofting Detail: 3 Hours
  • 7/22/09 - 7/29/09: Stem and Knee Cutout: 4 Hours
  • 7/30/09 - 8/16/09: Keel, Keelson, Skeg and Sternpost: 21 Hours
  • 8/16/09 - 9/5/09: Attaching Transom: 3 Hours
  • 9/28/09 - 9/29/09: Cutting Stem and Keel Rabbet, 9 Hours

- Total Project Labor Hours so far: 70.5 Hours
- Time since starting project: 123 days (3 months 31 days)
Nicely done blog Matt. Really enjoying it. Would have liked to have built a boat, but never did, but it's fun watching the process. Thanks for posting.

Truer words were never spoken David.
 
Cutting Stem and Keel Rabbet

This next part is cutting the rabbet into the Keel and Stem. The rabbet is a groove for planking to butt into. The rabbet must be accurately cut in order to form a tight seal. The rabbet for sunshine runs down both sides of the stem as shown and continues along the keel to the stern.

Image


Keel Rabbet

Cutting the Rabbet in the Keel was relatively easy since I had already beveled the keelson from the lofted lines in the Stem and Knee - Part 2 section.

To me, it seemed practical to try a Stanley #90 shoulder plane, and use the angle on the keelson as a reference to cut a 90 degree "groove" into the keel so that the groove had a depth 3/8", which will be the plank thickness. I used a test 3/8" piece to test occasionally also. This method worked really well for me and seems better than chopping out.. but I've got plenty of chisel chopping ahead.

Image


After several hours, a nice rabbet on both sides of the keel.

Image


Stem Rabbet

The stem was a little more challenging. At this point, I have to really trust my lofting skills which is where I'm getting all the angles for cutting the rabbet. The rolling bevels in the stem are wild compared to the gradual changes in the keel. Although I checked everything 4 times, there's a lot of time into the stem already and I don't want to ruin it! First step is to get the bearding and rabbet lines from the lofting onto the actual stem. The rabbet line is easy, since it's a fixed distance from the edge of the stem, so I just used a marking tool referenced off the stem edge. The bearding line however is a weird curve. I transfered the bearding line from the lofting onto the templates that I made earlier for cutting out the stem. I then drilled several small holes along these lines on the template so that I could lay the template on the actual stem and draw marks through the holes. Using the template is nice this way, since I could just flip it over and make matching marks on boths sides of the stem. I should point out that the curve for the bearding and rabbet lines were originally determined from the lofting drawing. This is explained further in Stem and Knee - Part 1

Image


With the lines transferred, I then cut a series of notches along the stem with chisels and then removed the waste between the notches. It's very nice to be able to do this on the bench instead of working on it vertically in the mold.

Image


The angles of the cuts are tested with a 3/8" template to ensure that the planking fits correctly at each point in the stem.

Image


Completed stem rabbet!

Image


And a shot of the whole thing.

Image


Finally, a close up of the intersection between the Stem and Keel. The rabbet still needs to be cut here so that there is a smooth transition. I have to wait at least a few days for the bedding compound to dry, otherwise, I'll be working with a big tar-like ball of shavings.

Image


Materials List:

None for this step!

Project Materials Summary:

  • Plans and Book: $60
  • Lofting Supplies: $47.88
  • Mold Supplies: $36
  • Strongback Lumber: $33
  • Transom Materials: $22
  • Stem and Knee: $47
  • Keelson, Keel, Skeg and Sternpost: $97
  • Silicon Bronze Hardware: $225
  • Larch Planking and Copper Rivets: $325

- Total Project Expenses so far: $892.88

Labor Hours Summary:

  • 5/29/09 - 6/8/09: Lofting - 12 Hours
  • 6/14/09 - 6/20/09: Building Molds: 5 Hours
  • 6/25/09 - 6/27/09: Building Strongback: 7.5 Hours
  • 6/30/09 - 7/13/09: Building Transom: 6 Hours
  • 7/14/09 - 7/20/09: Stem Lofting Detail: 3 Hours
  • 7/22/09 - 7/29/09: Stem and Knee Cutout: 4 Hours
  • 7/30/09 - 8/16/09: Keel, Keelson, Skeg and Sternpost: 21 Hours
  • 8/16/09 - 9/5/09: Attaching Transom: 3 Hours
  • 9/28/09 - 9/29/09: Cutting Stem and Keel Rabbet, 9 Hours

- Total Project Labor Hours so far: 70.5 Hours
- Time since starting project: 123 days (3 months 31 days)
This is great fun to watch. A lot more work than my canoe.

Thanks for sharing,
Steve
 
Discussion starter · #74 ·
Stem to Keel and Lining Off

Just a few more steps left before I can start putting the planking on the sides.

Cutting in the Rabbet Between Stem and Keel

The next crucial step is cutting in the rabbet between the Stem and Keel. This was done entirely by hand with a few sharp chisels. I used a small piece of wood (3"x1"x3/8") as a template, representing the plank, to ensure a smooth transition as I cut away the rabbet. Here is the before picture:

Image


And the after picture. This was done on both sides of course. Took about 3 hours.

Image


Lining Off

According to Walter Simmons, the architect of Sunshine (the model I'm building), Lining off is the "process with which you project the final plank layout onto the hull". This needs to be done to determine the shapes for the planks, which are actually quite curvy. However, if I do it right, the planks will have an effect that they look straight on the hull.

Of course, you only have to line off one half of the hull. The other half is exactly the same, just flipped, so your measurements are the same on each side.

The first step for me was to measure the length of each station from keel to sheer (bottom to top) and divide by the number of planks I'll be putting on (seven). I then marked off the location for each plank edge for each station.

Once this is done, the next step is to run a batten along these marks to make sure the curve is fair. It's more important that the curves are fair, rather than the planks being of equal width at each station.

To do the lining off, Mr. Simmons recommends a single batten method, in which you determine the position and curve of each plank as you go along, for each plank. Another method is to line off all of your planks at once using battens for each plank. I decided to try lining off all planks at once so that I could get a better feeling for how the planking would look. Of course, I can still use the single batten method later on.

Image


And here is the final result with all battens. I still have to make some adjustments at the stem.

Image


And that's it for now! Next step will be spiling and getting out the planks!

Materials List:

None for this step!

Project Materials Summary:

  • Plans and Book: $60
  • Lofting Supplies: $47.88
  • Mold Supplies: $36
  • Strongback Lumber: $33
  • Transom Materials: $22
  • Stem and Knee: $47
  • Keelson, Keel, Skeg and Sternpost: $97
  • Silicon Bronze Hardware: $225
  • Larch Planking and Copper Rivets: $325

- Total Project Expenses so far: $892.88

Labor Hours Summary:

  • 5/29/09 - 6/8/09: Lofting - 12 Hours
  • 6/14/09 - 6/20/09: Building Molds: 5 Hours
  • 6/25/09 - 6/27/09: Building Strongback: 7.5 Hours
  • 6/30/09 - 7/13/09: Building Transom: 6 Hours
  • 7/14/09 - 7/20/09: Stem Lofting Detail: 3 Hours
  • 7/22/09 - 7/29/09: Stem and Knee Cutout: 4 Hours
  • 7/30/09 - 8/16/09: Keel, Keelson, Skeg and Sternpost: 21 Hours
  • 8/16/09 - 9/5/09: Attaching Transom: 3 Hours
  • 9/28/09 - 9/29/09: Cutting Stem and Keel Rabbet, 9 Hours
  • 9/30/09 - 10/4/09: Stem to Keel and Lining Off, 4 Hours

- Total Project Labor Hours so far: 74.5 Hours
- Time since starting project: 142 days (4 months 19 days)
this is really fabulous…I am watching every step…cant wait to see the next step…good luck…
 
Stem to Keel and Lining Off

Just a few more steps left before I can start putting the planking on the sides.

Cutting in the Rabbet Between Stem and Keel

The next crucial step is cutting in the rabbet between the Stem and Keel. This was done entirely by hand with a few sharp chisels. I used a small piece of wood (3"x1"x3/8") as a template, representing the plank, to ensure a smooth transition as I cut away the rabbet. Here is the before picture:

Image


And the after picture. This was done on both sides of course. Took about 3 hours.

Image


Lining Off

According to Walter Simmons, the architect of Sunshine (the model I'm building), Lining off is the "process with which you project the final plank layout onto the hull". This needs to be done to determine the shapes for the planks, which are actually quite curvy. However, if I do it right, the planks will have an effect that they look straight on the hull.

Of course, you only have to line off one half of the hull. The other half is exactly the same, just flipped, so your measurements are the same on each side.

The first step for me was to measure the length of each station from keel to sheer (bottom to top) and divide by the number of planks I'll be putting on (seven). I then marked off the location for each plank edge for each station.

Once this is done, the next step is to run a batten along these marks to make sure the curve is fair. It's more important that the curves are fair, rather than the planks being of equal width at each station.

To do the lining off, Mr. Simmons recommends a single batten method, in which you determine the position and curve of each plank as you go along, for each plank. Another method is to line off all of your planks at once using battens for each plank. I decided to try lining off all planks at once so that I could get a better feeling for how the planking would look. Of course, I can still use the single batten method later on.

Image


And here is the final result with all battens. I still have to make some adjustments at the stem.

Image


And that's it for now! Next step will be spiling and getting out the planks!

Materials List:

None for this step!

Project Materials Summary:

  • Plans and Book: $60
  • Lofting Supplies: $47.88
  • Mold Supplies: $36
  • Strongback Lumber: $33
  • Transom Materials: $22
  • Stem and Knee: $47
  • Keelson, Keel, Skeg and Sternpost: $97
  • Silicon Bronze Hardware: $225
  • Larch Planking and Copper Rivets: $325

- Total Project Expenses so far: $892.88

Labor Hours Summary:

  • 5/29/09 - 6/8/09: Lofting - 12 Hours
  • 6/14/09 - 6/20/09: Building Molds: 5 Hours
  • 6/25/09 - 6/27/09: Building Strongback: 7.5 Hours
  • 6/30/09 - 7/13/09: Building Transom: 6 Hours
  • 7/14/09 - 7/20/09: Stem Lofting Detail: 3 Hours
  • 7/22/09 - 7/29/09: Stem and Knee Cutout: 4 Hours
  • 7/30/09 - 8/16/09: Keel, Keelson, Skeg and Sternpost: 21 Hours
  • 8/16/09 - 9/5/09: Attaching Transom: 3 Hours
  • 9/28/09 - 9/29/09: Cutting Stem and Keel Rabbet, 9 Hours
  • 9/30/09 - 10/4/09: Stem to Keel and Lining Off, 4 Hours

- Total Project Labor Hours so far: 74.5 Hours
- Time since starting project: 142 days (4 months 19 days)
This is great super blog
 
Stem to Keel and Lining Off

Just a few more steps left before I can start putting the planking on the sides.

Cutting in the Rabbet Between Stem and Keel

The next crucial step is cutting in the rabbet between the Stem and Keel. This was done entirely by hand with a few sharp chisels. I used a small piece of wood (3"x1"x3/8") as a template, representing the plank, to ensure a smooth transition as I cut away the rabbet. Here is the before picture:

Image


And the after picture. This was done on both sides of course. Took about 3 hours.

Image


Lining Off

According to Walter Simmons, the architect of Sunshine (the model I'm building), Lining off is the "process with which you project the final plank layout onto the hull". This needs to be done to determine the shapes for the planks, which are actually quite curvy. However, if I do it right, the planks will have an effect that they look straight on the hull.

Of course, you only have to line off one half of the hull. The other half is exactly the same, just flipped, so your measurements are the same on each side.

The first step for me was to measure the length of each station from keel to sheer (bottom to top) and divide by the number of planks I'll be putting on (seven). I then marked off the location for each plank edge for each station.

Once this is done, the next step is to run a batten along these marks to make sure the curve is fair. It's more important that the curves are fair, rather than the planks being of equal width at each station.

To do the lining off, Mr. Simmons recommends a single batten method, in which you determine the position and curve of each plank as you go along, for each plank. Another method is to line off all of your planks at once using battens for each plank. I decided to try lining off all planks at once so that I could get a better feeling for how the planking would look. Of course, I can still use the single batten method later on.

Image


And here is the final result with all battens. I still have to make some adjustments at the stem.

Image


And that's it for now! Next step will be spiling and getting out the planks!

Materials List:

None for this step!

Project Materials Summary:

  • Plans and Book: $60
  • Lofting Supplies: $47.88
  • Mold Supplies: $36
  • Strongback Lumber: $33
  • Transom Materials: $22
  • Stem and Knee: $47
  • Keelson, Keel, Skeg and Sternpost: $97
  • Silicon Bronze Hardware: $225
  • Larch Planking and Copper Rivets: $325

- Total Project Expenses so far: $892.88

Labor Hours Summary:

  • 5/29/09 - 6/8/09: Lofting - 12 Hours
  • 6/14/09 - 6/20/09: Building Molds: 5 Hours
  • 6/25/09 - 6/27/09: Building Strongback: 7.5 Hours
  • 6/30/09 - 7/13/09: Building Transom: 6 Hours
  • 7/14/09 - 7/20/09: Stem Lofting Detail: 3 Hours
  • 7/22/09 - 7/29/09: Stem and Knee Cutout: 4 Hours
  • 7/30/09 - 8/16/09: Keel, Keelson, Skeg and Sternpost: 21 Hours
  • 8/16/09 - 9/5/09: Attaching Transom: 3 Hours
  • 9/28/09 - 9/29/09: Cutting Stem and Keel Rabbet, 9 Hours
  • 9/30/09 - 10/4/09: Stem to Keel and Lining Off, 4 Hours

- Total Project Labor Hours so far: 74.5 Hours
- Time since starting project: 142 days (4 months 19 days)
well done , gibbs !

i'll have to start picking out a new sailing outfit soon .
 
Stem to Keel and Lining Off

Just a few more steps left before I can start putting the planking on the sides.

Cutting in the Rabbet Between Stem and Keel

The next crucial step is cutting in the rabbet between the Stem and Keel. This was done entirely by hand with a few sharp chisels. I used a small piece of wood (3"x1"x3/8") as a template, representing the plank, to ensure a smooth transition as I cut away the rabbet. Here is the before picture:

Image


And the after picture. This was done on both sides of course. Took about 3 hours.

Image


Lining Off

According to Walter Simmons, the architect of Sunshine (the model I'm building), Lining off is the "process with which you project the final plank layout onto the hull". This needs to be done to determine the shapes for the planks, which are actually quite curvy. However, if I do it right, the planks will have an effect that they look straight on the hull.

Of course, you only have to line off one half of the hull. The other half is exactly the same, just flipped, so your measurements are the same on each side.

The first step for me was to measure the length of each station from keel to sheer (bottom to top) and divide by the number of planks I'll be putting on (seven). I then marked off the location for each plank edge for each station.

Once this is done, the next step is to run a batten along these marks to make sure the curve is fair. It's more important that the curves are fair, rather than the planks being of equal width at each station.

To do the lining off, Mr. Simmons recommends a single batten method, in which you determine the position and curve of each plank as you go along, for each plank. Another method is to line off all of your planks at once using battens for each plank. I decided to try lining off all planks at once so that I could get a better feeling for how the planking would look. Of course, I can still use the single batten method later on.

Image


And here is the final result with all battens. I still have to make some adjustments at the stem.

Image


And that's it for now! Next step will be spiling and getting out the planks!

Materials List:

None for this step!

Project Materials Summary:

  • Plans and Book: $60
  • Lofting Supplies: $47.88
  • Mold Supplies: $36
  • Strongback Lumber: $33
  • Transom Materials: $22
  • Stem and Knee: $47
  • Keelson, Keel, Skeg and Sternpost: $97
  • Silicon Bronze Hardware: $225
  • Larch Planking and Copper Rivets: $325

- Total Project Expenses so far: $892.88

Labor Hours Summary:

  • 5/29/09 - 6/8/09: Lofting - 12 Hours
  • 6/14/09 - 6/20/09: Building Molds: 5 Hours
  • 6/25/09 - 6/27/09: Building Strongback: 7.5 Hours
  • 6/30/09 - 7/13/09: Building Transom: 6 Hours
  • 7/14/09 - 7/20/09: Stem Lofting Detail: 3 Hours
  • 7/22/09 - 7/29/09: Stem and Knee Cutout: 4 Hours
  • 7/30/09 - 8/16/09: Keel, Keelson, Skeg and Sternpost: 21 Hours
  • 8/16/09 - 9/5/09: Attaching Transom: 3 Hours
  • 9/28/09 - 9/29/09: Cutting Stem and Keel Rabbet, 9 Hours
  • 9/30/09 - 10/4/09: Stem to Keel and Lining Off, 4 Hours

- Total Project Labor Hours so far: 74.5 Hours
- Time since starting project: 142 days (4 months 19 days)
Dang it, patron.
You beat me to it.

Lee
 
Stem to Keel and Lining Off

Just a few more steps left before I can start putting the planking on the sides.

Cutting in the Rabbet Between Stem and Keel

The next crucial step is cutting in the rabbet between the Stem and Keel. This was done entirely by hand with a few sharp chisels. I used a small piece of wood (3"x1"x3/8") as a template, representing the plank, to ensure a smooth transition as I cut away the rabbet. Here is the before picture:

Image


And the after picture. This was done on both sides of course. Took about 3 hours.

Image


Lining Off

According to Walter Simmons, the architect of Sunshine (the model I'm building), Lining off is the "process with which you project the final plank layout onto the hull". This needs to be done to determine the shapes for the planks, which are actually quite curvy. However, if I do it right, the planks will have an effect that they look straight on the hull.

Of course, you only have to line off one half of the hull. The other half is exactly the same, just flipped, so your measurements are the same on each side.

The first step for me was to measure the length of each station from keel to sheer (bottom to top) and divide by the number of planks I'll be putting on (seven). I then marked off the location for each plank edge for each station.

Once this is done, the next step is to run a batten along these marks to make sure the curve is fair. It's more important that the curves are fair, rather than the planks being of equal width at each station.

To do the lining off, Mr. Simmons recommends a single batten method, in which you determine the position and curve of each plank as you go along, for each plank. Another method is to line off all of your planks at once using battens for each plank. I decided to try lining off all planks at once so that I could get a better feeling for how the planking would look. Of course, I can still use the single batten method later on.

Image


And here is the final result with all battens. I still have to make some adjustments at the stem.

Image


And that's it for now! Next step will be spiling and getting out the planks!

Materials List:

None for this step!

Project Materials Summary:

  • Plans and Book: $60
  • Lofting Supplies: $47.88
  • Mold Supplies: $36
  • Strongback Lumber: $33
  • Transom Materials: $22
  • Stem and Knee: $47
  • Keelson, Keel, Skeg and Sternpost: $97
  • Silicon Bronze Hardware: $225
  • Larch Planking and Copper Rivets: $325

- Total Project Expenses so far: $892.88

Labor Hours Summary:

  • 5/29/09 - 6/8/09: Lofting - 12 Hours
  • 6/14/09 - 6/20/09: Building Molds: 5 Hours
  • 6/25/09 - 6/27/09: Building Strongback: 7.5 Hours
  • 6/30/09 - 7/13/09: Building Transom: 6 Hours
  • 7/14/09 - 7/20/09: Stem Lofting Detail: 3 Hours
  • 7/22/09 - 7/29/09: Stem and Knee Cutout: 4 Hours
  • 7/30/09 - 8/16/09: Keel, Keelson, Skeg and Sternpost: 21 Hours
  • 8/16/09 - 9/5/09: Attaching Transom: 3 Hours
  • 9/28/09 - 9/29/09: Cutting Stem and Keel Rabbet, 9 Hours
  • 9/30/09 - 10/4/09: Stem to Keel and Lining Off, 4 Hours

- Total Project Labor Hours so far: 74.5 Hours
- Time since starting project: 142 days (4 months 19 days)
very nice looking design.
 
Stem to Keel and Lining Off

Just a few more steps left before I can start putting the planking on the sides.

Cutting in the Rabbet Between Stem and Keel

The next crucial step is cutting in the rabbet between the Stem and Keel. This was done entirely by hand with a few sharp chisels. I used a small piece of wood (3"x1"x3/8") as a template, representing the plank, to ensure a smooth transition as I cut away the rabbet. Here is the before picture:

Image


And the after picture. This was done on both sides of course. Took about 3 hours.

Image


Lining Off

According to Walter Simmons, the architect of Sunshine (the model I'm building), Lining off is the "process with which you project the final plank layout onto the hull". This needs to be done to determine the shapes for the planks, which are actually quite curvy. However, if I do it right, the planks will have an effect that they look straight on the hull.

Of course, you only have to line off one half of the hull. The other half is exactly the same, just flipped, so your measurements are the same on each side.

The first step for me was to measure the length of each station from keel to sheer (bottom to top) and divide by the number of planks I'll be putting on (seven). I then marked off the location for each plank edge for each station.

Once this is done, the next step is to run a batten along these marks to make sure the curve is fair. It's more important that the curves are fair, rather than the planks being of equal width at each station.

To do the lining off, Mr. Simmons recommends a single batten method, in which you determine the position and curve of each plank as you go along, for each plank. Another method is to line off all of your planks at once using battens for each plank. I decided to try lining off all planks at once so that I could get a better feeling for how the planking would look. Of course, I can still use the single batten method later on.

Image


And here is the final result with all battens. I still have to make some adjustments at the stem.

Image


And that's it for now! Next step will be spiling and getting out the planks!

Materials List:

None for this step!

Project Materials Summary:

  • Plans and Book: $60
  • Lofting Supplies: $47.88
  • Mold Supplies: $36
  • Strongback Lumber: $33
  • Transom Materials: $22
  • Stem and Knee: $47
  • Keelson, Keel, Skeg and Sternpost: $97
  • Silicon Bronze Hardware: $225
  • Larch Planking and Copper Rivets: $325

- Total Project Expenses so far: $892.88

Labor Hours Summary:

  • 5/29/09 - 6/8/09: Lofting - 12 Hours
  • 6/14/09 - 6/20/09: Building Molds: 5 Hours
  • 6/25/09 - 6/27/09: Building Strongback: 7.5 Hours
  • 6/30/09 - 7/13/09: Building Transom: 6 Hours
  • 7/14/09 - 7/20/09: Stem Lofting Detail: 3 Hours
  • 7/22/09 - 7/29/09: Stem and Knee Cutout: 4 Hours
  • 7/30/09 - 8/16/09: Keel, Keelson, Skeg and Sternpost: 21 Hours
  • 8/16/09 - 9/5/09: Attaching Transom: 3 Hours
  • 9/28/09 - 9/29/09: Cutting Stem and Keel Rabbet, 9 Hours
  • 9/30/09 - 10/4/09: Stem to Keel and Lining Off, 4 Hours

- Total Project Labor Hours so far: 74.5 Hours
- Time since starting project: 142 days (4 months 19 days)
great blog… keep it going. Look like the design will be able to handle surf…
 
61 - 80 of 113 Posts