LumberJocks
DAILY DEALS Sure-Foot Plus™ 3/4'' Pipe Clamp  |  Makita Makita Recon LCT203W 10.8 Volt Lithium Ion Impact Driver 2 Pc Kit

How to make a endgrain tumbling block butcher block board!

Blog entry by degoose posted 102 days ago 1723 reads 71 times favorited 28 comments Add to Favorites Watch

Hi guys ,, I had a request to make a tutorial with regards the endgrain Tumbling Block Design.
First off,.., You need to decide the size of the blocks…. for this example I used 1” stock… Or something similar.. actually just over .. once dressed.

Set the blade of the table saw to 60 degrees.. a bevel box makes this simple

I use the INCRA fence system so it is easy to rip bevels off side of the blade.

Once the bevels are ripped measure the length of the bevel and move the fence that distance plus the kerf and 1mm [ 1/25 “] for the variation of the kerf due to the angle. For my diamonds, the fence was moved 1 9/16 ” to cut 1 13/16” Bevel rip again. Do this for all three timbers.. I did it twice for all three…

I glue all three different timber diamonds together and clamp.[ ensure the grains of all three are perpendicular to each other..].

,


.
then cut to the required depth/ length and then glue up.
.

,


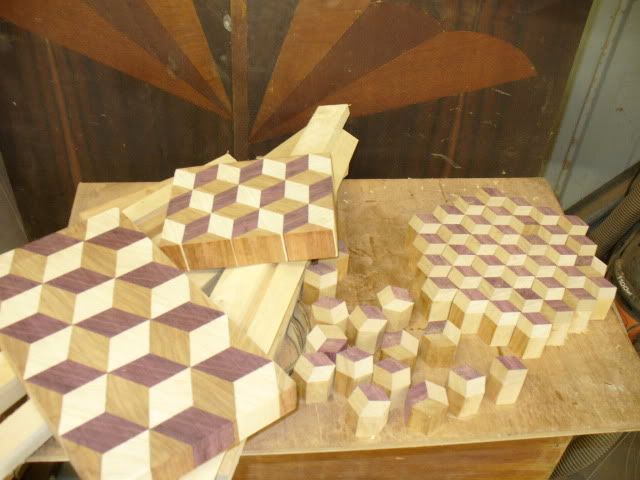
.With different size stock.
Any questions PM me.

-- Drink once, cut twice. New website up.... lazylarrywoodworks.com.au


28 comments so far

View hooky's profile

hooky

133 posts in 211 days


posted 102 days ago

Hi Larry this was very informative

all I need now to do this is

The wood
A Saw that tilts
A bevel Box
an incra fence system

yeah i think that just about covers it

Hey maybe you just want to ship me yours

Thanks

Hooky

-- Happiness is a way of travel , not a destination (Roy Goodman)

View degoose's profile

degoose

1981 posts in 247 days


posted 102 days ago

So you do have the clamps and the glue.!!

-- Drink once, cut twice. New website up.... lazylarrywoodworks.com.au

View hooky's profile

hooky

133 posts in 211 days


posted 102 days ago

sure do all good workshops have those

-- Happiness is a way of travel , not a destination (Roy Goodman)

View Russel's profile

Russel

2057 posts in 832 days


posted 102 days ago

Thanks for the instruction. It’s people like you who get me started using jigs and seeing things in a particular way and the next thing I’m on the road to making pretty stuff.

-- When you give someone a chance it may well be their last.

View poochie's profile

poochie

3 posts in 131 days


posted 102 days ago

thanks i always wanted to make something like this. thanks very much for the article will give it a try

View ellen35's profile

ellen35

531 posts in 325 days


posted 102 days ago

You are so clever!!!!
I have been hoping you’d post this!
It is on my “to do in the next month” list already!
Thank you Larry.
Ellen

-- Ellen on Cape Cod

View moshel's profile

moshel

471 posts in 576 days


posted 102 days ago

I know this sounds strange, but I just made one today! (well, I saw your prototype in one of the earlier posts).

I don’t have neither the bevel box nor the incra, so i’ll give my 2c:

to set the blade to 30/60 degrees (depends if you look at the half full or half empty), i cut a block on my mitre saw 30 degrees. as the mitre saw is pretty accurate and you can cut a 2×4, you get pretty good reference.

I did the math beforehand. first, the first cut to remove the end of the board (my blade also tilt toward the fence, so this is a tricky cut). now, measure the length of the beveled cut. the fence should be 1.5 times this length from the base of the blade. it pays to mill an additional piece of pine scrap to test that your piece is good (all sides should be equal).

-- The woods are lovely, dark and deep, but I have promises to keep...

View jockmike2's profile

jockmike2

7299 posts in 1139 days


posted 102 days ago

You glue a to tab b then b then glue what at 90 degree centegrade, whats a milimeter. Hey I’m lost, will you repeat that. Ah, nevermind.

-- Mike. mwurm13@yahoo.com

View sIKE's profile (online now)

sIKE

1094 posts in 647 days


posted 102 days ago

Thanks Larry! That is what I as looking for, nice to get up and see something like this…

-- //FC - Round Rock, TX - "Experience is what you get just after you need it"

View blackcherry's profile

blackcherry

730 posts in 716 days


posted 102 days ago

I wish you would of posted this last week toucans. Your way is a whole lot easier thank for sharing with the crew. Blkcherry

View eddy's profile

eddy

281 posts in 257 days


posted 102 days ago

that beats gluing 1 piece at a time. thats how i was doing it
will make some more this way looks a lot easer
thanks a lot

View degoose's profile

degoose

1981 posts in 247 days


posted 102 days ago

Nice to see you have crossed over to the dark side, lol

-- Drink once, cut twice. New website up.... lazylarrywoodworks.com.au

View HokieMojo's profile

HokieMojo

1140 posts in 621 days


posted 102 days ago

that looks too easy. are you messing with us? Just kidding. I know getting a good tight fit is tougher than it looks. nice work!

View majeagle1's profile

majeagle1

426 posts in 389 days


posted 102 days ago

Thanks alot Larry, this was a big help…............ now I may actually get down to business and make one!!!

-- Gene, Majestic Eagle Woodworks, http://majesticeagleww.etsy.com/, http://www.flickr.com/photos/majesticeagle/

View Don Newton's profile

Don Newton

528 posts in 511 days


posted 102 days ago

Awesome, it don’t get no better than that. Seems like a great project for a diversion.

-- Don, Pittsburgh

View DAN 's profile

DAN

6438 posts in 875 days


posted 102 days ago

not bad for a lumberbud ! thanks for posting … looks like fun

-- work from your heart and your spirit will live forever

View moshel's profile

moshel

471 posts in 576 days


posted 101 days ago

Three more tips :
1. make sure you can cut the “hexagonal sausage” using your mitre saw or crosscut sled in one pass. its very hard to get accurate results when cutting in two passes. believe me…
2. it pays to pass the “hexagonal sausage” through thicknesser. just light pass to level everything. you need to repeat the pass on 3 sides (its best to number them, its very confusing), lower just a bit and repeat on the other 3 sides.
3. leave enough milled “diamond” lumber unglued, so you can complete the pattern nicely

-- The woods are lovely, dark and deep, but I have promises to keep...

View woodsmithshop's profile

woodsmithshop

288 posts in 438 days


posted 100 days ago

Larry, now that you have everyone on here making boards, the next thing will be to rename this site to “Board Jocks” or ” Lazy Larry Jocks” lol

-- Smitty!!!

View SteveM's profile

SteveM

76 posts in 1060 days


posted 98 days ago

Larry, Thanks for once again sharing your remarkable skills with instructions that we of much lesser skills can understand. I continue to be amazed.

View a1Jim's profile (online now)

a1Jim

16611 posts in 470 days


posted 98 days ago

Hey Larry
You always amaze me with you ingenious and innovative work. Thanks for sharing all of your great work.

-- Jim from Heirloom Woodshop Southern Oregon

View stefang's profile

stefang

1644 posts in 227 days


posted 88 days ago

Great tutorial Larry. Thanks for sharing this. I plan to give it a go sometime. I have been doing something similar for many years called stick work (small scale stuff). The only real difference is that the diamonds are cross-cuts, so that the long glue joints are end grain. These are made into geo patterns and then sliced off to be used as inlays with the long at the end showing. They can be turned on a lathe for disk shaped inlays or just left with pointy ends. A bad photo example of it can be seen on ‘A Gimmicky turning’ on my projects page.

-- Mike, American in Norway

View ken90712's profile

ken90712

334 posts in 81 days


posted 81 days ago

Very well done! I have been wondering on how the 3D effect was pulled off! New to the site and I must say it is a pleasure to read about the tips and see the projects of so many fine woodworkers!

-- Ken, "Everyday above ground is a good day!"

View coloradoclimber's profile

coloradoclimber

448 posts in 960 days


posted 81 days ago

That is really cool !! thanks for taking the time to post. Having the walk through really helps and makes it look pretty straight forward.

Sitting here in front of the computer doing a mental walk through I’m still not clear on the following:

“Once the bevels are ripped measure the length of the bevel and move the fence that distance plus the kerf and 1mm [ 1/25] for the variation of the kerf due to the angle. For my diamonds, the fence was moved 1 9/16 to cut 1 13/16. Bevel rip again.”

A 60 degree blade angle is 30 degrees off of 90. 1 inch thick stock cut at 30 degrees should yield a bevel length of around 1 5/32 inch. I didn’t actually cut a piece of wood, just sitting here at the computer I drew a triangle, 1 inch tall on the vertical side, an angle 30 degrees off of vertical, and I get the angled side (the bevel) around 1 5/32. Not even close to 1 9/16 bevel. I’ll have to cut a piece and see what I get.

But let’s say I did have a bevel of 1 9/16. If the bevel is 1 9/16 I want the horizontal side, the side down on the table saw to also be 1 9/16. So I move the fence out 1 9/16 + the kerf width (1/8 or 2/16) + 1 mm. 1 mm is mostly 1/25 of an inch, lets say close to 1/32 for now. That ought to add up to 1 9/16 + 1/8 + 1/32 or 1 23/32. Still short of 1 13/16.

And I’m wondering if your numbers are transposed, did you mean to say you would move the fence 1 13/16 to get a cut of 1 9/16 ?

I’m sure if I cut some myself the numbers would fall into place. Just trying to do a mental walk through and I’m not able to get your numbers.

Thanks again for the post.

View degoose's profile

degoose

1981 posts in 247 days


posted 81 days ago

Just a transposition of the numbers..And the stock was around the 1” mark.. not exact.

-- Drink once, cut twice. New website up.... lazylarrywoodworks.com.au

View mmh's profile

mmh

1381 posts in 615 days


posted 80 days ago

Gee, it looks easy when YOU do it! Nice job.

-- "They who dream by day are cognizant of many things which escape those who dream only by night." ~ Edgar Allan Poe

View sIKE's profile (online now)

sIKE

1094 posts in 647 days


posted 60 days ago

Larry,

How long do you make your blanks? Just trying to get an idea of how much wood to buy.

-- //FC - Round Rock, TX - "Experience is what you get just after you need it"

View notottoman's profile

notottoman

449 posts in 123 days


posted 59 days ago

Thank you for the tuition.
So much to learn….....

-- "Even small steps makes a distance." (Shawn Phillips, musician)

View scrabby's profile

scrabby

8 posts in 79 days


posted 59 days ago

Awesome Mate – just joined the site as a relatively new hobbyist woodworker who wanted to make a few cutting boards as xmas gifts, and you’ve inspired and amazed me with your work.

Thanks.

-- Jim, North Vancouver, BC

You must be signed in to post the comments.

  • View all advertisers
  • Advertise with us

DISCLAIMER: Any posts on LJ are posted by individuals acting in their own right and do not necessarily reflect the views of LJ. LJ will not be held liable for the actions of any user.

Latest Projects | Latest Blog Entries | Latest Forum Topics

HomeRefurbers.com

Latest Projects | Latest Blog Entries | Latest Forum Topics

GardenTenders.com :: gardening showcase