LumberJocks Woodworking Forum banner
101 - 120 of 128 Posts
Discussion starter · #101 ·
Wagon Vise completed, endcaps bolted on, and top flattened.

Relatively quick turn around. This weekend was a busy one.

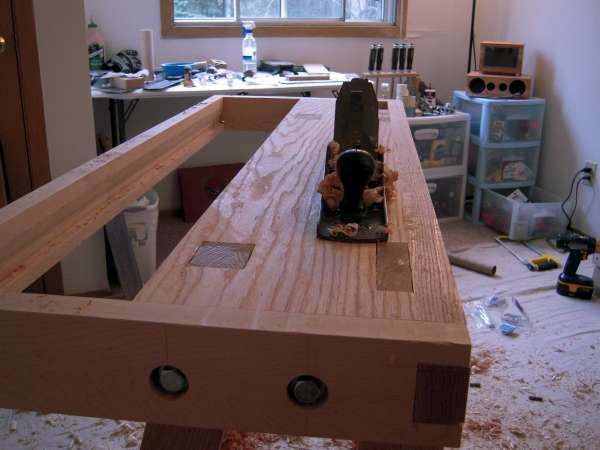
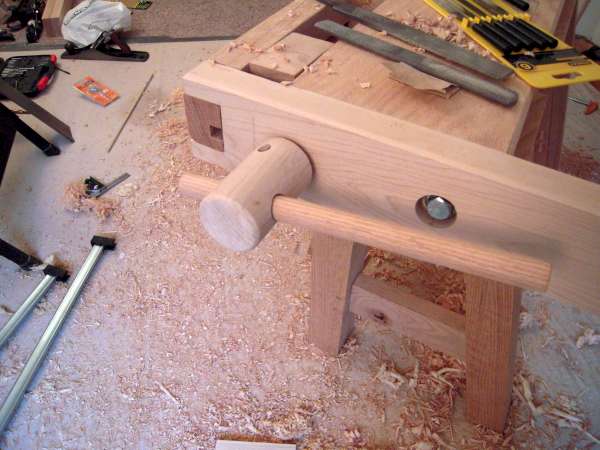
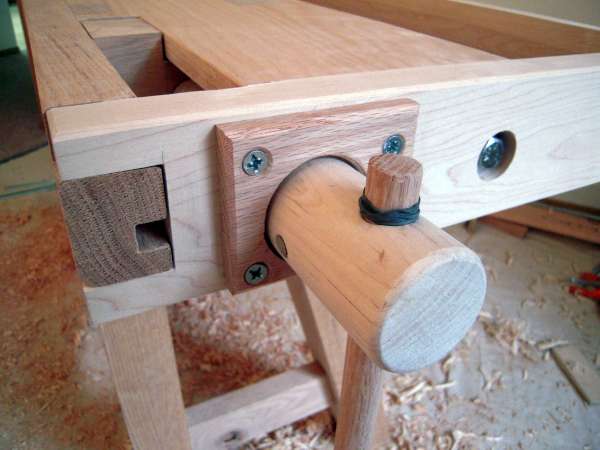
First thing I worked on after getting the screw and hub assembled for the wagon vise, was getting the endcaps drilled and bolted on the bench

1/2" bolts, counterbored into the endcaps
Image


with a nut and washer on the underside.
Image


Single 4" bolt on the wagon vise end due to width restrictions, and and double bolt on the leg vise end. Double bolt because I couldn't get the 4 1/2" bolt back too far due to the leg tenon being there, so I ended up using a 3" bolt on the back. I decided on this because I didn't like the pivot point being so far forward when I'm going to be having a tool well hanging off of it.

Image


With that done, I decided I'd flatten the top a little bit. Jack, Jointer, and Smoother (using my #5 1/2)

Image


Image


Image


With that done, I turned my attention back to the wagon vise. I had drilled the hole for the handle, and was going to wait until I could use my powered miter saw to cut the hub to length. Somewhere along the line I decided "What the heck, let's go for it". So I decided to give it a shot by hand first. I think it actually went better than I was expecting. I'm glad I did :)

Image


Image


Then I made the garter plate for it. I made it out of 1/2" oak. I used a 2 1/8" forstner bit about 1/4" deep to come up around the hub a bit, and a 1 1/4" to go the rest of the way through. Then I cut it in half with my handsaw. Drilled, and countersunk, and chamfered the edges.

Image


Image


I drilled 2 of the dog holes last night, which means the wagon is now functional :)

Image


Image


Image


Image


Tonight I drilled the rest of the dog holes. They're all 4" apart, and there's 5" of travel with the wagon vise.

Image


I also took a video of the wagon vise in operation. I was actually relatively surprised at how well it worked. Most of the noise is the handle rattling in the hub.

Thanks again Tony.

It's a barrel bolt.
Image


The tenons are a decent fit, but the barrel bolt holds it so it doesn't slide out. I did it that way so I could still remove it so I can take it apart to move. I also won't be gluing or pegging the top down at all, for the same reason.
 
Wagon Vise completed, endcaps bolted on, and top flattened.

Relatively quick turn around. This weekend was a busy one.

First thing I worked on after getting the screw and hub assembled for the wagon vise, was getting the endcaps drilled and bolted on the bench

1/2" bolts, counterbored into the endcaps
Image


with a nut and washer on the underside.
Image


Single 4" bolt on the wagon vise end due to width restrictions, and and double bolt on the leg vise end. Double bolt because I couldn't get the 4 1/2" bolt back too far due to the leg tenon being there, so I ended up using a 3" bolt on the back. I decided on this because I didn't like the pivot point being so far forward when I'm going to be having a tool well hanging off of it.

Image


With that done, I decided I'd flatten the top a little bit. Jack, Jointer, and Smoother (using my #5 1/2)

Image


Image


Image


With that done, I turned my attention back to the wagon vise. I had drilled the hole for the handle, and was going to wait until I could use my powered miter saw to cut the hub to length. Somewhere along the line I decided "What the heck, let's go for it". So I decided to give it a shot by hand first. I think it actually went better than I was expecting. I'm glad I did :)

Image


Image


Then I made the garter plate for it. I made it out of 1/2" oak. I used a 2 1/8" forstner bit about 1/4" deep to come up around the hub a bit, and a 1 1/4" to go the rest of the way through. Then I cut it in half with my handsaw. Drilled, and countersunk, and chamfered the edges.

Image


Image


I drilled 2 of the dog holes last night, which means the wagon is now functional :)

Image


Image


Image


Image


Tonight I drilled the rest of the dog holes. They're all 4" apart, and there's 5" of travel with the wagon vise.

Image


I also took a video of the wagon vise in operation. I was actually relatively surprised at how well it worked. Most of the noise is the handle rattling in the hub.

Got it. Thank ya sir.
 
Wagon Vise completed, endcaps bolted on, and top flattened.

Relatively quick turn around. This weekend was a busy one.

First thing I worked on after getting the screw and hub assembled for the wagon vise, was getting the endcaps drilled and bolted on the bench

1/2" bolts, counterbored into the endcaps
Image


with a nut and washer on the underside.
Image


Single 4" bolt on the wagon vise end due to width restrictions, and and double bolt on the leg vise end. Double bolt because I couldn't get the 4 1/2" bolt back too far due to the leg tenon being there, so I ended up using a 3" bolt on the back. I decided on this because I didn't like the pivot point being so far forward when I'm going to be having a tool well hanging off of it.

Image


With that done, I decided I'd flatten the top a little bit. Jack, Jointer, and Smoother (using my #5 1/2)

Image


Image


Image


With that done, I turned my attention back to the wagon vise. I had drilled the hole for the handle, and was going to wait until I could use my powered miter saw to cut the hub to length. Somewhere along the line I decided "What the heck, let's go for it". So I decided to give it a shot by hand first. I think it actually went better than I was expecting. I'm glad I did :)

Image


Image


Then I made the garter plate for it. I made it out of 1/2" oak. I used a 2 1/8" forstner bit about 1/4" deep to come up around the hub a bit, and a 1 1/4" to go the rest of the way through. Then I cut it in half with my handsaw. Drilled, and countersunk, and chamfered the edges.

Image


Image


I drilled 2 of the dog holes last night, which means the wagon is now functional :)

Image


Image


Image


Image


Tonight I drilled the rest of the dog holes. They're all 4" apart, and there's 5" of travel with the wagon vise.

Image


I also took a video of the wagon vise in operation. I was actually relatively surprised at how well it worked. Most of the noise is the handle rattling in the hub.

Nice job Mos, nearly there now.
 
Discussion starter · #104 ·
Tool Well and Leg Vise

I've made some progress since the last blog entry, so I suppose I should probably update things here…

I've cut some pine up to make the bottom of my tool well. I may rabbet the ends in the future so they sit just a hair lower, but for now they do the job fine. Didn't take many pictures of progress here, as it was just cutting up a couple pine boards and laying them in the groove and on the shelf.

Image


Image


Image


The main part of of this blog post is the leg vise. I guess I might as well just jump right in with pictures

Some how I managed to not take any pictures of the work in progress with my camera… so all I've got are some phone pictures, unfortunately. And not very many.

Basically, I ripped it to width, cut it to length, and roughly cut it to shape with my circular saw. Then I planed it flat, and planed the shape to be what I wanted.
Image


Image


Yup, horrible at taking pictures sometimes.

Oh well, we continue.

I'm starting to realize how poorly documented this part of the build is…

I made another 1.5" wooden screw, and fellow LJ Mauricio was kind enough to send me an excess 3.5" hub, and also drilled a 1.5" hole in the end. I used it for my leg vise. I think he was right, 3.5" looks much better on the leg vise than 2" would have.

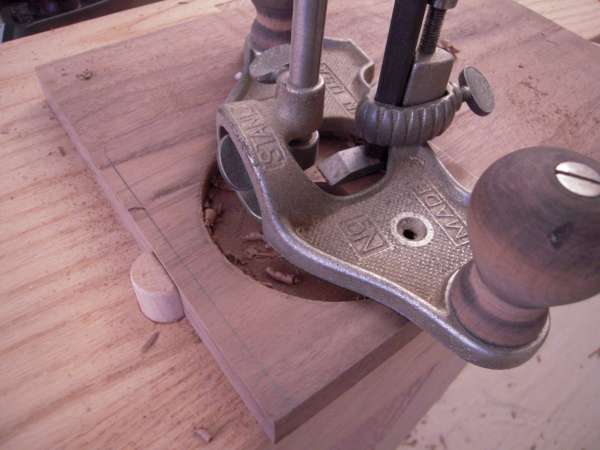
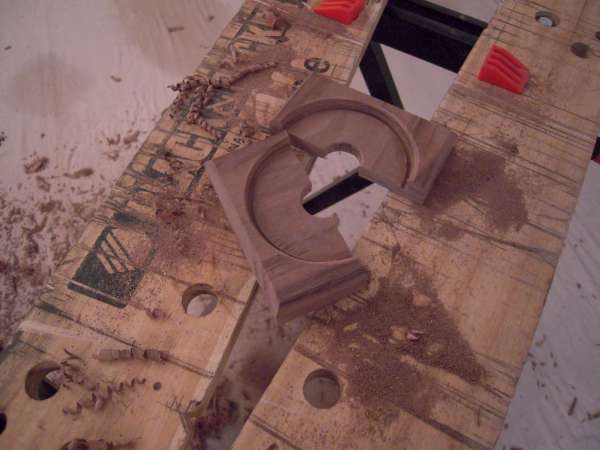
Anywho, I do have good picture coverage of this part. Here I'm working on making the garter plate for the leg vise out of a piece of 3/4" walnut
Image


I drilled a 1" hole with a forstner bit about 3/8" deep. Enough so I could easily get the forstner bit started again with out having to use the spur in the middle. Because I then used a 3.5" hole saw, centering the pilot bit on the cone that the forstner bit spur left. I drilled down about 1/4" (I think it ended up being 3/16, or even 3/8" deep in the end, but oh well)

That established the outside edge, and then I drilled the rest of the way through the 1" hole.

Then it was time to chisel out some of the excess waste

A quick test fit with the hub
Image


A #71 to level out the bottom
Image


And there we have it
Image


Now it's time to cut it off of the rest of the piece of walnut
Image


Image


Image


And cut it in half so I can get it around the screw
Image


And there she is (And yes, the screw placement was intentional based on the grain patterns of the chop. I also cut the chop to size with that as the intended result)
Image


Image


Then, it was time to drill out the back leg, so the leg vise screw could pass through it, so as to not limit my leg vise to a capacity of 5"
Image


Image


Then drilled a hole at the bottom of the leg for the parallel guide
Image


And made another screw (threaded dowel, I suppose) for the parallel guide. I drilled a 1.5" deep hole in the 2" thick vise chop, and then tapped it so I could thread the parallel guide screw in place, and still remove it if I have to.

And here's the parallel guide screw, and the walnut nut
Image


And with that, it was time to give it a test
Image


Image


Also made a 1" oak handle for it. Continuing the theme of "alternating" oak and maple (wagon vise was maple end cap, oak garter plate, maple hub, oak handle. Leg vise is oak chop, maple hub, oak handle)
Image


It does actually close all the way even with the 3/4" thick nut still on it. So that makes me happy, in that I shouldn't have to ever remove it in use, I don't think.
Image


Out of curiosity, this is about as wide open as it'll go with the current parallel guide screw
Image


That'll probably be plenty :)
Image


Image


Thanks for checkin' it out :) This will probably be the last blog of the main bench build. I will hopefully be able to find a time to get some finish on it, but that will have to wait until a time I can do it somewhere other than in my apartment.
 

Attachments

Tool Well and Leg Vise

I've made some progress since the last blog entry, so I suppose I should probably update things here…

I've cut some pine up to make the bottom of my tool well. I may rabbet the ends in the future so they sit just a hair lower, but for now they do the job fine. Didn't take many pictures of progress here, as it was just cutting up a couple pine boards and laying them in the groove and on the shelf.

Image


Image


Image


The main part of of this blog post is the leg vise. I guess I might as well just jump right in with pictures

Some how I managed to not take any pictures of the work in progress with my camera… so all I've got are some phone pictures, unfortunately. And not very many.

Basically, I ripped it to width, cut it to length, and roughly cut it to shape with my circular saw. Then I planed it flat, and planed the shape to be what I wanted.
Image


Image


Yup, horrible at taking pictures sometimes.

Oh well, we continue.

I'm starting to realize how poorly documented this part of the build is…

I made another 1.5" wooden screw, and fellow LJ Mauricio was kind enough to send me an excess 3.5" hub, and also drilled a 1.5" hole in the end. I used it for my leg vise. I think he was right, 3.5" looks much better on the leg vise than 2" would have.

Anywho, I do have good picture coverage of this part. Here I'm working on making the garter plate for the leg vise out of a piece of 3/4" walnut
Image


I drilled a 1" hole with a forstner bit about 3/8" deep. Enough so I could easily get the forstner bit started again with out having to use the spur in the middle. Because I then used a 3.5" hole saw, centering the pilot bit on the cone that the forstner bit spur left. I drilled down about 1/4" (I think it ended up being 3/16, or even 3/8" deep in the end, but oh well)

That established the outside edge, and then I drilled the rest of the way through the 1" hole.

Then it was time to chisel out some of the excess waste

A quick test fit with the hub
Image


A #71 to level out the bottom
Image


And there we have it
Image


Now it's time to cut it off of the rest of the piece of walnut
Image


Image


Image


And cut it in half so I can get it around the screw
Image


And there she is (And yes, the screw placement was intentional based on the grain patterns of the chop. I also cut the chop to size with that as the intended result)
Image


Image


Then, it was time to drill out the back leg, so the leg vise screw could pass through it, so as to not limit my leg vise to a capacity of 5"
Image


Image


Then drilled a hole at the bottom of the leg for the parallel guide
Image


And made another screw (threaded dowel, I suppose) for the parallel guide. I drilled a 1.5" deep hole in the 2" thick vise chop, and then tapped it so I could thread the parallel guide screw in place, and still remove it if I have to.

And here's the parallel guide screw, and the walnut nut
Image


And with that, it was time to give it a test
Image


Image


Also made a 1" oak handle for it. Continuing the theme of "alternating" oak and maple (wagon vise was maple end cap, oak garter plate, maple hub, oak handle. Leg vise is oak chop, maple hub, oak handle)
Image


It does actually close all the way even with the 3/4" thick nut still on it. So that makes me happy, in that I shouldn't have to ever remove it in use, I don't think.
Image


Out of curiosity, this is about as wide open as it'll go with the current parallel guide screw
Image


That'll probably be plenty :)
Image


Image


Thanks for checkin' it out :) This will probably be the last blog of the main bench build. I will hopefully be able to find a time to get some finish on it, but that will have to wait until a time I can do it somewhere other than in my apartment.
Top shelf workmanship Mos, a definite favorite.

Thanks for posting the process of your fine bench.
 

Attachments

Tool Well and Leg Vise

I've made some progress since the last blog entry, so I suppose I should probably update things here…

I've cut some pine up to make the bottom of my tool well. I may rabbet the ends in the future so they sit just a hair lower, but for now they do the job fine. Didn't take many pictures of progress here, as it was just cutting up a couple pine boards and laying them in the groove and on the shelf.

Image


Image


Image


The main part of of this blog post is the leg vise. I guess I might as well just jump right in with pictures

Some how I managed to not take any pictures of the work in progress with my camera… so all I've got are some phone pictures, unfortunately. And not very many.

Basically, I ripped it to width, cut it to length, and roughly cut it to shape with my circular saw. Then I planed it flat, and planed the shape to be what I wanted.
Image


Image


Yup, horrible at taking pictures sometimes.

Oh well, we continue.

I'm starting to realize how poorly documented this part of the build is…

I made another 1.5" wooden screw, and fellow LJ Mauricio was kind enough to send me an excess 3.5" hub, and also drilled a 1.5" hole in the end. I used it for my leg vise. I think he was right, 3.5" looks much better on the leg vise than 2" would have.

Anywho, I do have good picture coverage of this part. Here I'm working on making the garter plate for the leg vise out of a piece of 3/4" walnut
Image


I drilled a 1" hole with a forstner bit about 3/8" deep. Enough so I could easily get the forstner bit started again with out having to use the spur in the middle. Because I then used a 3.5" hole saw, centering the pilot bit on the cone that the forstner bit spur left. I drilled down about 1/4" (I think it ended up being 3/16, or even 3/8" deep in the end, but oh well)

That established the outside edge, and then I drilled the rest of the way through the 1" hole.

Then it was time to chisel out some of the excess waste

A quick test fit with the hub
Image


A #71 to level out the bottom
Image


And there we have it
Image


Now it's time to cut it off of the rest of the piece of walnut
Image


Image


Image


And cut it in half so I can get it around the screw
Image


And there she is (And yes, the screw placement was intentional based on the grain patterns of the chop. I also cut the chop to size with that as the intended result)
Image


Image


Then, it was time to drill out the back leg, so the leg vise screw could pass through it, so as to not limit my leg vise to a capacity of 5"
Image


Image


Then drilled a hole at the bottom of the leg for the parallel guide
Image


And made another screw (threaded dowel, I suppose) for the parallel guide. I drilled a 1.5" deep hole in the 2" thick vise chop, and then tapped it so I could thread the parallel guide screw in place, and still remove it if I have to.

And here's the parallel guide screw, and the walnut nut
Image


And with that, it was time to give it a test
Image


Image


Also made a 1" oak handle for it. Continuing the theme of "alternating" oak and maple (wagon vise was maple end cap, oak garter plate, maple hub, oak handle. Leg vise is oak chop, maple hub, oak handle)
Image


It does actually close all the way even with the 3/4" thick nut still on it. So that makes me happy, in that I shouldn't have to ever remove it in use, I don't think.
Image


Out of curiosity, this is about as wide open as it'll go with the current parallel guide screw
Image


That'll probably be plenty :)
Image


Image


Thanks for checkin' it out :) This will probably be the last blog of the main bench build. I will hopefully be able to find a time to get some finish on it, but that will have to wait until a time I can do it somewhere other than in my apartment.
Wow it looks awesome Mos! I told you it would close all the way! :) The two screws really look so cool man. I like how the hub sits inside the garter. And the chop shape is pretty cool. Great looking bench bro!

How easily does the nut move? Is it easy to move with your foot?

12.5" of capacity is very nice, you think you wont use it but if you have it you'll find uses for it. I know I have.

Bravo man, good show!
 

Attachments

Tool Well and Leg Vise

I've made some progress since the last blog entry, so I suppose I should probably update things here…

I've cut some pine up to make the bottom of my tool well. I may rabbet the ends in the future so they sit just a hair lower, but for now they do the job fine. Didn't take many pictures of progress here, as it was just cutting up a couple pine boards and laying them in the groove and on the shelf.

Image


Image


Image


The main part of of this blog post is the leg vise. I guess I might as well just jump right in with pictures

Some how I managed to not take any pictures of the work in progress with my camera… so all I've got are some phone pictures, unfortunately. And not very many.

Basically, I ripped it to width, cut it to length, and roughly cut it to shape with my circular saw. Then I planed it flat, and planed the shape to be what I wanted.
Image


Image


Yup, horrible at taking pictures sometimes.

Oh well, we continue.

I'm starting to realize how poorly documented this part of the build is…

I made another 1.5" wooden screw, and fellow LJ Mauricio was kind enough to send me an excess 3.5" hub, and also drilled a 1.5" hole in the end. I used it for my leg vise. I think he was right, 3.5" looks much better on the leg vise than 2" would have.

Anywho, I do have good picture coverage of this part. Here I'm working on making the garter plate for the leg vise out of a piece of 3/4" walnut
Image


I drilled a 1" hole with a forstner bit about 3/8" deep. Enough so I could easily get the forstner bit started again with out having to use the spur in the middle. Because I then used a 3.5" hole saw, centering the pilot bit on the cone that the forstner bit spur left. I drilled down about 1/4" (I think it ended up being 3/16, or even 3/8" deep in the end, but oh well)

That established the outside edge, and then I drilled the rest of the way through the 1" hole.

Then it was time to chisel out some of the excess waste

A quick test fit with the hub
Image


A #71 to level out the bottom
Image


And there we have it
Image


Now it's time to cut it off of the rest of the piece of walnut
Image


Image


Image


And cut it in half so I can get it around the screw
Image


And there she is (And yes, the screw placement was intentional based on the grain patterns of the chop. I also cut the chop to size with that as the intended result)
Image


Image


Then, it was time to drill out the back leg, so the leg vise screw could pass through it, so as to not limit my leg vise to a capacity of 5"
Image


Image


Then drilled a hole at the bottom of the leg for the parallel guide
Image


And made another screw (threaded dowel, I suppose) for the parallel guide. I drilled a 1.5" deep hole in the 2" thick vise chop, and then tapped it so I could thread the parallel guide screw in place, and still remove it if I have to.

And here's the parallel guide screw, and the walnut nut
Image


And with that, it was time to give it a test
Image


Image


Also made a 1" oak handle for it. Continuing the theme of "alternating" oak and maple (wagon vise was maple end cap, oak garter plate, maple hub, oak handle. Leg vise is oak chop, maple hub, oak handle)
Image


It does actually close all the way even with the 3/4" thick nut still on it. So that makes me happy, in that I shouldn't have to ever remove it in use, I don't think.
Image


Out of curiosity, this is about as wide open as it'll go with the current parallel guide screw
Image


That'll probably be plenty :)
Image


Image


Thanks for checkin' it out :) This will probably be the last blog of the main bench build. I will hopefully be able to find a time to get some finish on it, but that will have to wait until a time I can do it somewhere other than in my apartment.
Freakin' Awesome Mos!
 

Attachments

Tool Well and Leg Vise

I've made some progress since the last blog entry, so I suppose I should probably update things here…

I've cut some pine up to make the bottom of my tool well. I may rabbet the ends in the future so they sit just a hair lower, but for now they do the job fine. Didn't take many pictures of progress here, as it was just cutting up a couple pine boards and laying them in the groove and on the shelf.

Image


Image


Image


The main part of of this blog post is the leg vise. I guess I might as well just jump right in with pictures

Some how I managed to not take any pictures of the work in progress with my camera… so all I've got are some phone pictures, unfortunately. And not very many.

Basically, I ripped it to width, cut it to length, and roughly cut it to shape with my circular saw. Then I planed it flat, and planed the shape to be what I wanted.
Image


Image


Yup, horrible at taking pictures sometimes.

Oh well, we continue.

I'm starting to realize how poorly documented this part of the build is…

I made another 1.5" wooden screw, and fellow LJ Mauricio was kind enough to send me an excess 3.5" hub, and also drilled a 1.5" hole in the end. I used it for my leg vise. I think he was right, 3.5" looks much better on the leg vise than 2" would have.

Anywho, I do have good picture coverage of this part. Here I'm working on making the garter plate for the leg vise out of a piece of 3/4" walnut
Image


I drilled a 1" hole with a forstner bit about 3/8" deep. Enough so I could easily get the forstner bit started again with out having to use the spur in the middle. Because I then used a 3.5" hole saw, centering the pilot bit on the cone that the forstner bit spur left. I drilled down about 1/4" (I think it ended up being 3/16, or even 3/8" deep in the end, but oh well)

That established the outside edge, and then I drilled the rest of the way through the 1" hole.

Then it was time to chisel out some of the excess waste

A quick test fit with the hub
Image


A #71 to level out the bottom
Image


And there we have it
Image


Now it's time to cut it off of the rest of the piece of walnut
Image


Image


Image


And cut it in half so I can get it around the screw
Image


And there she is (And yes, the screw placement was intentional based on the grain patterns of the chop. I also cut the chop to size with that as the intended result)
Image


Image


Then, it was time to drill out the back leg, so the leg vise screw could pass through it, so as to not limit my leg vise to a capacity of 5"
Image


Image


Then drilled a hole at the bottom of the leg for the parallel guide
Image


And made another screw (threaded dowel, I suppose) for the parallel guide. I drilled a 1.5" deep hole in the 2" thick vise chop, and then tapped it so I could thread the parallel guide screw in place, and still remove it if I have to.

And here's the parallel guide screw, and the walnut nut
Image


And with that, it was time to give it a test
Image


Image


Also made a 1" oak handle for it. Continuing the theme of "alternating" oak and maple (wagon vise was maple end cap, oak garter plate, maple hub, oak handle. Leg vise is oak chop, maple hub, oak handle)
Image


It does actually close all the way even with the 3/4" thick nut still on it. So that makes me happy, in that I shouldn't have to ever remove it in use, I don't think.
Image


Out of curiosity, this is about as wide open as it'll go with the current parallel guide screw
Image


That'll probably be plenty :)
Image


Image


Thanks for checkin' it out :) This will probably be the last blog of the main bench build. I will hopefully be able to find a time to get some finish on it, but that will have to wait until a time I can do it somewhere other than in my apartment.
Fantastic…So , you turn the walnut nut to open the lower part of the chop ?
 

Attachments

Discussion starter · #109 ·
Tool Well and Leg Vise

I've made some progress since the last blog entry, so I suppose I should probably update things here…

I've cut some pine up to make the bottom of my tool well. I may rabbet the ends in the future so they sit just a hair lower, but for now they do the job fine. Didn't take many pictures of progress here, as it was just cutting up a couple pine boards and laying them in the groove and on the shelf.

Image


Image


Image


The main part of of this blog post is the leg vise. I guess I might as well just jump right in with pictures

Some how I managed to not take any pictures of the work in progress with my camera… so all I've got are some phone pictures, unfortunately. And not very many.

Basically, I ripped it to width, cut it to length, and roughly cut it to shape with my circular saw. Then I planed it flat, and planed the shape to be what I wanted.
Image


Image


Yup, horrible at taking pictures sometimes.

Oh well, we continue.

I'm starting to realize how poorly documented this part of the build is…

I made another 1.5" wooden screw, and fellow LJ Mauricio was kind enough to send me an excess 3.5" hub, and also drilled a 1.5" hole in the end. I used it for my leg vise. I think he was right, 3.5" looks much better on the leg vise than 2" would have.

Anywho, I do have good picture coverage of this part. Here I'm working on making the garter plate for the leg vise out of a piece of 3/4" walnut
Image


I drilled a 1" hole with a forstner bit about 3/8" deep. Enough so I could easily get the forstner bit started again with out having to use the spur in the middle. Because I then used a 3.5" hole saw, centering the pilot bit on the cone that the forstner bit spur left. I drilled down about 1/4" (I think it ended up being 3/16, or even 3/8" deep in the end, but oh well)

That established the outside edge, and then I drilled the rest of the way through the 1" hole.

Then it was time to chisel out some of the excess waste

A quick test fit with the hub
Image


A #71 to level out the bottom
Image


And there we have it
Image


Now it's time to cut it off of the rest of the piece of walnut
Image


Image


Image


And cut it in half so I can get it around the screw
Image


And there she is (And yes, the screw placement was intentional based on the grain patterns of the chop. I also cut the chop to size with that as the intended result)
Image


Image


Then, it was time to drill out the back leg, so the leg vise screw could pass through it, so as to not limit my leg vise to a capacity of 5"
Image


Image


Then drilled a hole at the bottom of the leg for the parallel guide
Image


And made another screw (threaded dowel, I suppose) for the parallel guide. I drilled a 1.5" deep hole in the 2" thick vise chop, and then tapped it so I could thread the parallel guide screw in place, and still remove it if I have to.

And here's the parallel guide screw, and the walnut nut
Image


And with that, it was time to give it a test
Image


Image


Also made a 1" oak handle for it. Continuing the theme of "alternating" oak and maple (wagon vise was maple end cap, oak garter plate, maple hub, oak handle. Leg vise is oak chop, maple hub, oak handle)
Image


It does actually close all the way even with the 3/4" thick nut still on it. So that makes me happy, in that I shouldn't have to ever remove it in use, I don't think.
Image


Out of curiosity, this is about as wide open as it'll go with the current parallel guide screw
Image


That'll probably be plenty :)
Image


Image


Thanks for checkin' it out :) This will probably be the last blog of the main bench build. I will hopefully be able to find a time to get some finish on it, but that will have to wait until a time I can do it somewhere other than in my apartment.
Thanks Waho. Posting here is part of what keeps me going sometimes :)

-

Thanks Mauricio. I did end up enlarging the hole in the chop to 1 5/8" from the 1 1/2" it was originally. It compensated for the wobble in the hub a little bit that way, and prevented it from slightly binding.

It is pretty easy to move except in 2 spots, but it's easy to move in the 3-4" closest to the cop, so it shouldn't be an issue. I can move it with my foot, but I may have to make a new one, slightly larger. This one is a little small for foot operation, I think. Maybe if I get used to it it'll be ok.

I pushed the workmate to its limits, so I will do my best to do that to the bench too. 12.5" capacity shall be utilized at some point I'm sure lol

-

Thanks Eric :)

-

Thanks Widdle. The walnut nut (that is surprisingly awkward to type) takes the place of having a traditional parallel guide and pin. Instead of having the pin, I have the nut which hits the leg and prevents the bottom of the vise from closing instead of clamping the work piece
 

Attachments

Tool Well and Leg Vise

I've made some progress since the last blog entry, so I suppose I should probably update things here…

I've cut some pine up to make the bottom of my tool well. I may rabbet the ends in the future so they sit just a hair lower, but for now they do the job fine. Didn't take many pictures of progress here, as it was just cutting up a couple pine boards and laying them in the groove and on the shelf.

Image


Image


Image


The main part of of this blog post is the leg vise. I guess I might as well just jump right in with pictures

Some how I managed to not take any pictures of the work in progress with my camera… so all I've got are some phone pictures, unfortunately. And not very many.

Basically, I ripped it to width, cut it to length, and roughly cut it to shape with my circular saw. Then I planed it flat, and planed the shape to be what I wanted.
Image


Image


Yup, horrible at taking pictures sometimes.

Oh well, we continue.

I'm starting to realize how poorly documented this part of the build is…

I made another 1.5" wooden screw, and fellow LJ Mauricio was kind enough to send me an excess 3.5" hub, and also drilled a 1.5" hole in the end. I used it for my leg vise. I think he was right, 3.5" looks much better on the leg vise than 2" would have.

Anywho, I do have good picture coverage of this part. Here I'm working on making the garter plate for the leg vise out of a piece of 3/4" walnut
Image


I drilled a 1" hole with a forstner bit about 3/8" deep. Enough so I could easily get the forstner bit started again with out having to use the spur in the middle. Because I then used a 3.5" hole saw, centering the pilot bit on the cone that the forstner bit spur left. I drilled down about 1/4" (I think it ended up being 3/16, or even 3/8" deep in the end, but oh well)

That established the outside edge, and then I drilled the rest of the way through the 1" hole.

Then it was time to chisel out some of the excess waste

A quick test fit with the hub
Image


A #71 to level out the bottom
Image


And there we have it
Image


Now it's time to cut it off of the rest of the piece of walnut
Image


Image


Image


And cut it in half so I can get it around the screw
Image


And there she is (And yes, the screw placement was intentional based on the grain patterns of the chop. I also cut the chop to size with that as the intended result)
Image


Image


Then, it was time to drill out the back leg, so the leg vise screw could pass through it, so as to not limit my leg vise to a capacity of 5"
Image


Image


Then drilled a hole at the bottom of the leg for the parallel guide
Image


And made another screw (threaded dowel, I suppose) for the parallel guide. I drilled a 1.5" deep hole in the 2" thick vise chop, and then tapped it so I could thread the parallel guide screw in place, and still remove it if I have to.

And here's the parallel guide screw, and the walnut nut
Image


And with that, it was time to give it a test
Image


Image


Also made a 1" oak handle for it. Continuing the theme of "alternating" oak and maple (wagon vise was maple end cap, oak garter plate, maple hub, oak handle. Leg vise is oak chop, maple hub, oak handle)
Image


It does actually close all the way even with the 3/4" thick nut still on it. So that makes me happy, in that I shouldn't have to ever remove it in use, I don't think.
Image


Out of curiosity, this is about as wide open as it'll go with the current parallel guide screw
Image


That'll probably be plenty :)
Image


Image


Thanks for checkin' it out :) This will probably be the last blog of the main bench build. I will hopefully be able to find a time to get some finish on it, but that will have to wait until a time I can do it somewhere other than in my apartment.
Very stylin by the way…
 

Attachments

Tool Well and Leg Vise

I've made some progress since the last blog entry, so I suppose I should probably update things here…

I've cut some pine up to make the bottom of my tool well. I may rabbet the ends in the future so they sit just a hair lower, but for now they do the job fine. Didn't take many pictures of progress here, as it was just cutting up a couple pine boards and laying them in the groove and on the shelf.

Image


Image


Image


The main part of of this blog post is the leg vise. I guess I might as well just jump right in with pictures

Some how I managed to not take any pictures of the work in progress with my camera… so all I've got are some phone pictures, unfortunately. And not very many.

Basically, I ripped it to width, cut it to length, and roughly cut it to shape with my circular saw. Then I planed it flat, and planed the shape to be what I wanted.
Image


Image


Yup, horrible at taking pictures sometimes.

Oh well, we continue.

I'm starting to realize how poorly documented this part of the build is…

I made another 1.5" wooden screw, and fellow LJ Mauricio was kind enough to send me an excess 3.5" hub, and also drilled a 1.5" hole in the end. I used it for my leg vise. I think he was right, 3.5" looks much better on the leg vise than 2" would have.

Anywho, I do have good picture coverage of this part. Here I'm working on making the garter plate for the leg vise out of a piece of 3/4" walnut
Image


I drilled a 1" hole with a forstner bit about 3/8" deep. Enough so I could easily get the forstner bit started again with out having to use the spur in the middle. Because I then used a 3.5" hole saw, centering the pilot bit on the cone that the forstner bit spur left. I drilled down about 1/4" (I think it ended up being 3/16, or even 3/8" deep in the end, but oh well)

That established the outside edge, and then I drilled the rest of the way through the 1" hole.

Then it was time to chisel out some of the excess waste

A quick test fit with the hub
Image


A #71 to level out the bottom
Image


And there we have it
Image


Now it's time to cut it off of the rest of the piece of walnut
Image


Image


Image


And cut it in half so I can get it around the screw
Image


And there she is (And yes, the screw placement was intentional based on the grain patterns of the chop. I also cut the chop to size with that as the intended result)
Image


Image


Then, it was time to drill out the back leg, so the leg vise screw could pass through it, so as to not limit my leg vise to a capacity of 5"
Image


Image


Then drilled a hole at the bottom of the leg for the parallel guide
Image


And made another screw (threaded dowel, I suppose) for the parallel guide. I drilled a 1.5" deep hole in the 2" thick vise chop, and then tapped it so I could thread the parallel guide screw in place, and still remove it if I have to.

And here's the parallel guide screw, and the walnut nut
Image


And with that, it was time to give it a test
Image


Image


Also made a 1" oak handle for it. Continuing the theme of "alternating" oak and maple (wagon vise was maple end cap, oak garter plate, maple hub, oak handle. Leg vise is oak chop, maple hub, oak handle)
Image


It does actually close all the way even with the 3/4" thick nut still on it. So that makes me happy, in that I shouldn't have to ever remove it in use, I don't think.
Image


Out of curiosity, this is about as wide open as it'll go with the current parallel guide screw
Image


That'll probably be plenty :)
Image


Image


Thanks for checkin' it out :) This will probably be the last blog of the main bench build. I will hopefully be able to find a time to get some finish on it, but that will have to wait until a time I can do it somewhere other than in my apartment.
Wow! Your leg vise opens so far, you could almost get another workbench in it.

Great work Mos.
 

Attachments

Tool Well and Leg Vise

I've made some progress since the last blog entry, so I suppose I should probably update things here…

I've cut some pine up to make the bottom of my tool well. I may rabbet the ends in the future so they sit just a hair lower, but for now they do the job fine. Didn't take many pictures of progress here, as it was just cutting up a couple pine boards and laying them in the groove and on the shelf.

Image


Image


Image


The main part of of this blog post is the leg vise. I guess I might as well just jump right in with pictures

Some how I managed to not take any pictures of the work in progress with my camera… so all I've got are some phone pictures, unfortunately. And not very many.

Basically, I ripped it to width, cut it to length, and roughly cut it to shape with my circular saw. Then I planed it flat, and planed the shape to be what I wanted.
Image


Image


Yup, horrible at taking pictures sometimes.

Oh well, we continue.

I'm starting to realize how poorly documented this part of the build is…

I made another 1.5" wooden screw, and fellow LJ Mauricio was kind enough to send me an excess 3.5" hub, and also drilled a 1.5" hole in the end. I used it for my leg vise. I think he was right, 3.5" looks much better on the leg vise than 2" would have.

Anywho, I do have good picture coverage of this part. Here I'm working on making the garter plate for the leg vise out of a piece of 3/4" walnut
Image


I drilled a 1" hole with a forstner bit about 3/8" deep. Enough so I could easily get the forstner bit started again with out having to use the spur in the middle. Because I then used a 3.5" hole saw, centering the pilot bit on the cone that the forstner bit spur left. I drilled down about 1/4" (I think it ended up being 3/16, or even 3/8" deep in the end, but oh well)

That established the outside edge, and then I drilled the rest of the way through the 1" hole.

Then it was time to chisel out some of the excess waste

A quick test fit with the hub
Image


A #71 to level out the bottom
Image


And there we have it
Image


Now it's time to cut it off of the rest of the piece of walnut
Image


Image


Image


And cut it in half so I can get it around the screw
Image


And there she is (And yes, the screw placement was intentional based on the grain patterns of the chop. I also cut the chop to size with that as the intended result)
Image


Image


Then, it was time to drill out the back leg, so the leg vise screw could pass through it, so as to not limit my leg vise to a capacity of 5"
Image


Image


Then drilled a hole at the bottom of the leg for the parallel guide
Image


And made another screw (threaded dowel, I suppose) for the parallel guide. I drilled a 1.5" deep hole in the 2" thick vise chop, and then tapped it so I could thread the parallel guide screw in place, and still remove it if I have to.

And here's the parallel guide screw, and the walnut nut
Image


And with that, it was time to give it a test
Image


Image


Also made a 1" oak handle for it. Continuing the theme of "alternating" oak and maple (wagon vise was maple end cap, oak garter plate, maple hub, oak handle. Leg vise is oak chop, maple hub, oak handle)
Image


It does actually close all the way even with the 3/4" thick nut still on it. So that makes me happy, in that I shouldn't have to ever remove it in use, I don't think.
Image


Out of curiosity, this is about as wide open as it'll go with the current parallel guide screw
Image


That'll probably be plenty :)
Image


Image


Thanks for checkin' it out :) This will probably be the last blog of the main bench build. I will hopefully be able to find a time to get some finish on it, but that will have to wait until a time I can do it somewhere other than in my apartment.
Sweet. A wood nut and a crooked leg? It doesn't get better than that!
 

Attachments

Tool Well and Leg Vise

I've made some progress since the last blog entry, so I suppose I should probably update things here…

I've cut some pine up to make the bottom of my tool well. I may rabbet the ends in the future so they sit just a hair lower, but for now they do the job fine. Didn't take many pictures of progress here, as it was just cutting up a couple pine boards and laying them in the groove and on the shelf.

Image


Image


Image


The main part of of this blog post is the leg vise. I guess I might as well just jump right in with pictures

Some how I managed to not take any pictures of the work in progress with my camera… so all I've got are some phone pictures, unfortunately. And not very many.

Basically, I ripped it to width, cut it to length, and roughly cut it to shape with my circular saw. Then I planed it flat, and planed the shape to be what I wanted.
Image


Image


Yup, horrible at taking pictures sometimes.

Oh well, we continue.

I'm starting to realize how poorly documented this part of the build is…

I made another 1.5" wooden screw, and fellow LJ Mauricio was kind enough to send me an excess 3.5" hub, and also drilled a 1.5" hole in the end. I used it for my leg vise. I think he was right, 3.5" looks much better on the leg vise than 2" would have.

Anywho, I do have good picture coverage of this part. Here I'm working on making the garter plate for the leg vise out of a piece of 3/4" walnut
Image


I drilled a 1" hole with a forstner bit about 3/8" deep. Enough so I could easily get the forstner bit started again with out having to use the spur in the middle. Because I then used a 3.5" hole saw, centering the pilot bit on the cone that the forstner bit spur left. I drilled down about 1/4" (I think it ended up being 3/16, or even 3/8" deep in the end, but oh well)

That established the outside edge, and then I drilled the rest of the way through the 1" hole.

Then it was time to chisel out some of the excess waste

A quick test fit with the hub
Image


A #71 to level out the bottom
Image


And there we have it
Image


Now it's time to cut it off of the rest of the piece of walnut
Image


Image


Image


And cut it in half so I can get it around the screw
Image


And there she is (And yes, the screw placement was intentional based on the grain patterns of the chop. I also cut the chop to size with that as the intended result)
Image


Image


Then, it was time to drill out the back leg, so the leg vise screw could pass through it, so as to not limit my leg vise to a capacity of 5"
Image


Image


Then drilled a hole at the bottom of the leg for the parallel guide
Image


And made another screw (threaded dowel, I suppose) for the parallel guide. I drilled a 1.5" deep hole in the 2" thick vise chop, and then tapped it so I could thread the parallel guide screw in place, and still remove it if I have to.

And here's the parallel guide screw, and the walnut nut
Image


And with that, it was time to give it a test
Image


Image


Also made a 1" oak handle for it. Continuing the theme of "alternating" oak and maple (wagon vise was maple end cap, oak garter plate, maple hub, oak handle. Leg vise is oak chop, maple hub, oak handle)
Image


It does actually close all the way even with the 3/4" thick nut still on it. So that makes me happy, in that I shouldn't have to ever remove it in use, I don't think.
Image


Out of curiosity, this is about as wide open as it'll go with the current parallel guide screw
Image


That'll probably be plenty :)
Image


Image


Thanks for checkin' it out :) This will probably be the last blog of the main bench build. I will hopefully be able to find a time to get some finish on it, but that will have to wait until a time I can do it somewhere other than in my apartment.
Sweet bench there, outstanding work. I know it is very satisfying to get one of these finished, it is a major process. Your work will really improve once you start using it.
 

Attachments

Tool Well and Leg Vise

I've made some progress since the last blog entry, so I suppose I should probably update things here…

I've cut some pine up to make the bottom of my tool well. I may rabbet the ends in the future so they sit just a hair lower, but for now they do the job fine. Didn't take many pictures of progress here, as it was just cutting up a couple pine boards and laying them in the groove and on the shelf.

Image


Image


Image


The main part of of this blog post is the leg vise. I guess I might as well just jump right in with pictures

Some how I managed to not take any pictures of the work in progress with my camera… so all I've got are some phone pictures, unfortunately. And not very many.

Basically, I ripped it to width, cut it to length, and roughly cut it to shape with my circular saw. Then I planed it flat, and planed the shape to be what I wanted.
Image


Image


Yup, horrible at taking pictures sometimes.

Oh well, we continue.

I'm starting to realize how poorly documented this part of the build is…

I made another 1.5" wooden screw, and fellow LJ Mauricio was kind enough to send me an excess 3.5" hub, and also drilled a 1.5" hole in the end. I used it for my leg vise. I think he was right, 3.5" looks much better on the leg vise than 2" would have.

Anywho, I do have good picture coverage of this part. Here I'm working on making the garter plate for the leg vise out of a piece of 3/4" walnut
Image


I drilled a 1" hole with a forstner bit about 3/8" deep. Enough so I could easily get the forstner bit started again with out having to use the spur in the middle. Because I then used a 3.5" hole saw, centering the pilot bit on the cone that the forstner bit spur left. I drilled down about 1/4" (I think it ended up being 3/16, or even 3/8" deep in the end, but oh well)

That established the outside edge, and then I drilled the rest of the way through the 1" hole.

Then it was time to chisel out some of the excess waste

A quick test fit with the hub
Image


A #71 to level out the bottom
Image


And there we have it
Image


Now it's time to cut it off of the rest of the piece of walnut
Image


Image


Image


And cut it in half so I can get it around the screw
Image


And there she is (And yes, the screw placement was intentional based on the grain patterns of the chop. I also cut the chop to size with that as the intended result)
Image


Image


Then, it was time to drill out the back leg, so the leg vise screw could pass through it, so as to not limit my leg vise to a capacity of 5"
Image


Image


Then drilled a hole at the bottom of the leg for the parallel guide
Image


And made another screw (threaded dowel, I suppose) for the parallel guide. I drilled a 1.5" deep hole in the 2" thick vise chop, and then tapped it so I could thread the parallel guide screw in place, and still remove it if I have to.

And here's the parallel guide screw, and the walnut nut
Image


And with that, it was time to give it a test
Image


Image


Also made a 1" oak handle for it. Continuing the theme of "alternating" oak and maple (wagon vise was maple end cap, oak garter plate, maple hub, oak handle. Leg vise is oak chop, maple hub, oak handle)
Image


It does actually close all the way even with the 3/4" thick nut still on it. So that makes me happy, in that I shouldn't have to ever remove it in use, I don't think.
Image


Out of curiosity, this is about as wide open as it'll go with the current parallel guide screw
Image


That'll probably be plenty :)
Image


Image


Thanks for checkin' it out :) This will probably be the last blog of the main bench build. I will hopefully be able to find a time to get some finish on it, but that will have to wait until a time I can do it somewhere other than in my apartment.
Excellent build, Mos! From the wooden screws to the splayed legs, I love it all…

This tool should last the rest of your life, and make every project a lil easier. Congrats!

Thanks for the photos and inspiration, too!!!!!!!!!!!!
 

Attachments

Discussion starter · #115 ·
Tool Well and Leg Vise

I've made some progress since the last blog entry, so I suppose I should probably update things here…

I've cut some pine up to make the bottom of my tool well. I may rabbet the ends in the future so they sit just a hair lower, but for now they do the job fine. Didn't take many pictures of progress here, as it was just cutting up a couple pine boards and laying them in the groove and on the shelf.

Image


Image


Image


The main part of of this blog post is the leg vise. I guess I might as well just jump right in with pictures

Some how I managed to not take any pictures of the work in progress with my camera… so all I've got are some phone pictures, unfortunately. And not very many.

Basically, I ripped it to width, cut it to length, and roughly cut it to shape with my circular saw. Then I planed it flat, and planed the shape to be what I wanted.
Image


Image


Yup, horrible at taking pictures sometimes.

Oh well, we continue.

I'm starting to realize how poorly documented this part of the build is…

I made another 1.5" wooden screw, and fellow LJ Mauricio was kind enough to send me an excess 3.5" hub, and also drilled a 1.5" hole in the end. I used it for my leg vise. I think he was right, 3.5" looks much better on the leg vise than 2" would have.

Anywho, I do have good picture coverage of this part. Here I'm working on making the garter plate for the leg vise out of a piece of 3/4" walnut
Image


I drilled a 1" hole with a forstner bit about 3/8" deep. Enough so I could easily get the forstner bit started again with out having to use the spur in the middle. Because I then used a 3.5" hole saw, centering the pilot bit on the cone that the forstner bit spur left. I drilled down about 1/4" (I think it ended up being 3/16, or even 3/8" deep in the end, but oh well)

That established the outside edge, and then I drilled the rest of the way through the 1" hole.

Then it was time to chisel out some of the excess waste

A quick test fit with the hub
Image


A #71 to level out the bottom
Image


And there we have it
Image


Now it's time to cut it off of the rest of the piece of walnut
Image


Image


Image


And cut it in half so I can get it around the screw
Image


And there she is (And yes, the screw placement was intentional based on the grain patterns of the chop. I also cut the chop to size with that as the intended result)
Image


Image


Then, it was time to drill out the back leg, so the leg vise screw could pass through it, so as to not limit my leg vise to a capacity of 5"
Image


Image


Then drilled a hole at the bottom of the leg for the parallel guide
Image


And made another screw (threaded dowel, I suppose) for the parallel guide. I drilled a 1.5" deep hole in the 2" thick vise chop, and then tapped it so I could thread the parallel guide screw in place, and still remove it if I have to.

And here's the parallel guide screw, and the walnut nut
Image


And with that, it was time to give it a test
Image


Image


Also made a 1" oak handle for it. Continuing the theme of "alternating" oak and maple (wagon vise was maple end cap, oak garter plate, maple hub, oak handle. Leg vise is oak chop, maple hub, oak handle)
Image


It does actually close all the way even with the 3/4" thick nut still on it. So that makes me happy, in that I shouldn't have to ever remove it in use, I don't think.
Image


Out of curiosity, this is about as wide open as it'll go with the current parallel guide screw
Image


That'll probably be plenty :)
Image


Image


Thanks for checkin' it out :) This will probably be the last blog of the main bench build. I will hopefully be able to find a time to get some finish on it, but that will have to wait until a time I can do it somewhere other than in my apartment.
Andy Thanks, that made me take a picture this morning… :p
Image


Thanks everyone. I do hope that I can get some better work done, or if nothing else, just make the work a little easier and quicker. Looking forward to using this sucker :)
 

Attachments

Tool Well and Leg Vise

I've made some progress since the last blog entry, so I suppose I should probably update things here…

I've cut some pine up to make the bottom of my tool well. I may rabbet the ends in the future so they sit just a hair lower, but for now they do the job fine. Didn't take many pictures of progress here, as it was just cutting up a couple pine boards and laying them in the groove and on the shelf.

Image


Image


Image


The main part of of this blog post is the leg vise. I guess I might as well just jump right in with pictures

Some how I managed to not take any pictures of the work in progress with my camera… so all I've got are some phone pictures, unfortunately. And not very many.

Basically, I ripped it to width, cut it to length, and roughly cut it to shape with my circular saw. Then I planed it flat, and planed the shape to be what I wanted.
Image


Image


Yup, horrible at taking pictures sometimes.

Oh well, we continue.

I'm starting to realize how poorly documented this part of the build is…

I made another 1.5" wooden screw, and fellow LJ Mauricio was kind enough to send me an excess 3.5" hub, and also drilled a 1.5" hole in the end. I used it for my leg vise. I think he was right, 3.5" looks much better on the leg vise than 2" would have.

Anywho, I do have good picture coverage of this part. Here I'm working on making the garter plate for the leg vise out of a piece of 3/4" walnut
Image


I drilled a 1" hole with a forstner bit about 3/8" deep. Enough so I could easily get the forstner bit started again with out having to use the spur in the middle. Because I then used a 3.5" hole saw, centering the pilot bit on the cone that the forstner bit spur left. I drilled down about 1/4" (I think it ended up being 3/16, or even 3/8" deep in the end, but oh well)

That established the outside edge, and then I drilled the rest of the way through the 1" hole.

Then it was time to chisel out some of the excess waste

A quick test fit with the hub
Image


A #71 to level out the bottom
Image


And there we have it
Image


Now it's time to cut it off of the rest of the piece of walnut
Image


Image


Image


And cut it in half so I can get it around the screw
Image


And there she is (And yes, the screw placement was intentional based on the grain patterns of the chop. I also cut the chop to size with that as the intended result)
Image


Image


Then, it was time to drill out the back leg, so the leg vise screw could pass through it, so as to not limit my leg vise to a capacity of 5"
Image


Image


Then drilled a hole at the bottom of the leg for the parallel guide
Image


And made another screw (threaded dowel, I suppose) for the parallel guide. I drilled a 1.5" deep hole in the 2" thick vise chop, and then tapped it so I could thread the parallel guide screw in place, and still remove it if I have to.

And here's the parallel guide screw, and the walnut nut
Image


And with that, it was time to give it a test
Image


Image


Also made a 1" oak handle for it. Continuing the theme of "alternating" oak and maple (wagon vise was maple end cap, oak garter plate, maple hub, oak handle. Leg vise is oak chop, maple hub, oak handle)
Image


It does actually close all the way even with the 3/4" thick nut still on it. So that makes me happy, in that I shouldn't have to ever remove it in use, I don't think.
Image


Out of curiosity, this is about as wide open as it'll go with the current parallel guide screw
Image


That'll probably be plenty :)
Image


Image


Thanks for checkin' it out :) This will probably be the last blog of the main bench build. I will hopefully be able to find a time to get some finish on it, but that will have to wait until a time I can do it somewhere other than in my apartment.
Brilliant!!!
 

Attachments

Tool Well and Leg Vise

I've made some progress since the last blog entry, so I suppose I should probably update things here…

I've cut some pine up to make the bottom of my tool well. I may rabbet the ends in the future so they sit just a hair lower, but for now they do the job fine. Didn't take many pictures of progress here, as it was just cutting up a couple pine boards and laying them in the groove and on the shelf.

Image


Image


Image


The main part of of this blog post is the leg vise. I guess I might as well just jump right in with pictures

Some how I managed to not take any pictures of the work in progress with my camera… so all I've got are some phone pictures, unfortunately. And not very many.

Basically, I ripped it to width, cut it to length, and roughly cut it to shape with my circular saw. Then I planed it flat, and planed the shape to be what I wanted.
Image


Image


Yup, horrible at taking pictures sometimes.

Oh well, we continue.

I'm starting to realize how poorly documented this part of the build is…

I made another 1.5" wooden screw, and fellow LJ Mauricio was kind enough to send me an excess 3.5" hub, and also drilled a 1.5" hole in the end. I used it for my leg vise. I think he was right, 3.5" looks much better on the leg vise than 2" would have.

Anywho, I do have good picture coverage of this part. Here I'm working on making the garter plate for the leg vise out of a piece of 3/4" walnut
Image


I drilled a 1" hole with a forstner bit about 3/8" deep. Enough so I could easily get the forstner bit started again with out having to use the spur in the middle. Because I then used a 3.5" hole saw, centering the pilot bit on the cone that the forstner bit spur left. I drilled down about 1/4" (I think it ended up being 3/16, or even 3/8" deep in the end, but oh well)

That established the outside edge, and then I drilled the rest of the way through the 1" hole.

Then it was time to chisel out some of the excess waste

A quick test fit with the hub
Image


A #71 to level out the bottom
Image


And there we have it
Image


Now it's time to cut it off of the rest of the piece of walnut
Image


Image


Image


And cut it in half so I can get it around the screw
Image


And there she is (And yes, the screw placement was intentional based on the grain patterns of the chop. I also cut the chop to size with that as the intended result)
Image


Image


Then, it was time to drill out the back leg, so the leg vise screw could pass through it, so as to not limit my leg vise to a capacity of 5"
Image


Image


Then drilled a hole at the bottom of the leg for the parallel guide
Image


And made another screw (threaded dowel, I suppose) for the parallel guide. I drilled a 1.5" deep hole in the 2" thick vise chop, and then tapped it so I could thread the parallel guide screw in place, and still remove it if I have to.

And here's the parallel guide screw, and the walnut nut
Image


And with that, it was time to give it a test
Image


Image


Also made a 1" oak handle for it. Continuing the theme of "alternating" oak and maple (wagon vise was maple end cap, oak garter plate, maple hub, oak handle. Leg vise is oak chop, maple hub, oak handle)
Image


It does actually close all the way even with the 3/4" thick nut still on it. So that makes me happy, in that I shouldn't have to ever remove it in use, I don't think.
Image


Out of curiosity, this is about as wide open as it'll go with the current parallel guide screw
Image


That'll probably be plenty :)
Image


Image


Thanks for checkin' it out :) This will probably be the last blog of the main bench build. I will hopefully be able to find a time to get some finish on it, but that will have to wait until a time I can do it somewhere other than in my apartment.
You're definitely earning yourself a place in the Hall of Hand Tool Badasses. What you can pull off in such a small work area is inspiring.
 

Attachments

Tool Well and Leg Vise

I've made some progress since the last blog entry, so I suppose I should probably update things here…

I've cut some pine up to make the bottom of my tool well. I may rabbet the ends in the future so they sit just a hair lower, but for now they do the job fine. Didn't take many pictures of progress here, as it was just cutting up a couple pine boards and laying them in the groove and on the shelf.

Image


Image


Image


The main part of of this blog post is the leg vise. I guess I might as well just jump right in with pictures

Some how I managed to not take any pictures of the work in progress with my camera… so all I've got are some phone pictures, unfortunately. And not very many.

Basically, I ripped it to width, cut it to length, and roughly cut it to shape with my circular saw. Then I planed it flat, and planed the shape to be what I wanted.
Image


Image


Yup, horrible at taking pictures sometimes.

Oh well, we continue.

I'm starting to realize how poorly documented this part of the build is…

I made another 1.5" wooden screw, and fellow LJ Mauricio was kind enough to send me an excess 3.5" hub, and also drilled a 1.5" hole in the end. I used it for my leg vise. I think he was right, 3.5" looks much better on the leg vise than 2" would have.

Anywho, I do have good picture coverage of this part. Here I'm working on making the garter plate for the leg vise out of a piece of 3/4" walnut
Image


I drilled a 1" hole with a forstner bit about 3/8" deep. Enough so I could easily get the forstner bit started again with out having to use the spur in the middle. Because I then used a 3.5" hole saw, centering the pilot bit on the cone that the forstner bit spur left. I drilled down about 1/4" (I think it ended up being 3/16, or even 3/8" deep in the end, but oh well)

That established the outside edge, and then I drilled the rest of the way through the 1" hole.

Then it was time to chisel out some of the excess waste

A quick test fit with the hub
Image


A #71 to level out the bottom
Image


And there we have it
Image


Now it's time to cut it off of the rest of the piece of walnut
Image


Image


Image


And cut it in half so I can get it around the screw
Image


And there she is (And yes, the screw placement was intentional based on the grain patterns of the chop. I also cut the chop to size with that as the intended result)
Image


Image


Then, it was time to drill out the back leg, so the leg vise screw could pass through it, so as to not limit my leg vise to a capacity of 5"
Image


Image


Then drilled a hole at the bottom of the leg for the parallel guide
Image


And made another screw (threaded dowel, I suppose) for the parallel guide. I drilled a 1.5" deep hole in the 2" thick vise chop, and then tapped it so I could thread the parallel guide screw in place, and still remove it if I have to.

And here's the parallel guide screw, and the walnut nut
Image


And with that, it was time to give it a test
Image


Image


Also made a 1" oak handle for it. Continuing the theme of "alternating" oak and maple (wagon vise was maple end cap, oak garter plate, maple hub, oak handle. Leg vise is oak chop, maple hub, oak handle)
Image


It does actually close all the way even with the 3/4" thick nut still on it. So that makes me happy, in that I shouldn't have to ever remove it in use, I don't think.
Image


Out of curiosity, this is about as wide open as it'll go with the current parallel guide screw
Image


That'll probably be plenty :)
Image


Image


Thanks for checkin' it out :) This will probably be the last blog of the main bench build. I will hopefully be able to find a time to get some finish on it, but that will have to wait until a time I can do it somewhere other than in my apartment.
My wife and I lived in a small apartment when we first got married, and bought an unfinished, you-assemble table with four chairs from Target. I spread out a tarp and cardboard on the floor of the spare bedroom and did assy, glue-up, sanding and finishing in there. It was a royal pain, and doesn't get me to near the experience Mos has pulling off the projects he does with that bench (first the workmate, now the workbench).

There is serious woodworking bad-ass-ness eminating from the Twin Cities these days… Congrats, Mos. Well done.
 

Attachments

Discussion starter · #119 ·
Tool Well and Leg Vise

I've made some progress since the last blog entry, so I suppose I should probably update things here…

I've cut some pine up to make the bottom of my tool well. I may rabbet the ends in the future so they sit just a hair lower, but for now they do the job fine. Didn't take many pictures of progress here, as it was just cutting up a couple pine boards and laying them in the groove and on the shelf.

Image


Image


Image


The main part of of this blog post is the leg vise. I guess I might as well just jump right in with pictures

Some how I managed to not take any pictures of the work in progress with my camera… so all I've got are some phone pictures, unfortunately. And not very many.

Basically, I ripped it to width, cut it to length, and roughly cut it to shape with my circular saw. Then I planed it flat, and planed the shape to be what I wanted.
Image


Image


Yup, horrible at taking pictures sometimes.

Oh well, we continue.

I'm starting to realize how poorly documented this part of the build is…

I made another 1.5" wooden screw, and fellow LJ Mauricio was kind enough to send me an excess 3.5" hub, and also drilled a 1.5" hole in the end. I used it for my leg vise. I think he was right, 3.5" looks much better on the leg vise than 2" would have.

Anywho, I do have good picture coverage of this part. Here I'm working on making the garter plate for the leg vise out of a piece of 3/4" walnut
Image


I drilled a 1" hole with a forstner bit about 3/8" deep. Enough so I could easily get the forstner bit started again with out having to use the spur in the middle. Because I then used a 3.5" hole saw, centering the pilot bit on the cone that the forstner bit spur left. I drilled down about 1/4" (I think it ended up being 3/16, or even 3/8" deep in the end, but oh well)

That established the outside edge, and then I drilled the rest of the way through the 1" hole.

Then it was time to chisel out some of the excess waste

A quick test fit with the hub
Image


A #71 to level out the bottom
Image


And there we have it
Image


Now it's time to cut it off of the rest of the piece of walnut
Image


Image


Image


And cut it in half so I can get it around the screw
Image


And there she is (And yes, the screw placement was intentional based on the grain patterns of the chop. I also cut the chop to size with that as the intended result)
Image


Image


Then, it was time to drill out the back leg, so the leg vise screw could pass through it, so as to not limit my leg vise to a capacity of 5"
Image


Image


Then drilled a hole at the bottom of the leg for the parallel guide
Image


And made another screw (threaded dowel, I suppose) for the parallel guide. I drilled a 1.5" deep hole in the 2" thick vise chop, and then tapped it so I could thread the parallel guide screw in place, and still remove it if I have to.

And here's the parallel guide screw, and the walnut nut
Image


And with that, it was time to give it a test
Image


Image


Also made a 1" oak handle for it. Continuing the theme of "alternating" oak and maple (wagon vise was maple end cap, oak garter plate, maple hub, oak handle. Leg vise is oak chop, maple hub, oak handle)
Image


It does actually close all the way even with the 3/4" thick nut still on it. So that makes me happy, in that I shouldn't have to ever remove it in use, I don't think.
Image


Out of curiosity, this is about as wide open as it'll go with the current parallel guide screw
Image


That'll probably be plenty :)
Image


Image


Thanks for checkin' it out :) This will probably be the last blog of the main bench build. I will hopefully be able to find a time to get some finish on it, but that will have to wait until a time I can do it somewhere other than in my apartment.
Thanks Brian :)

Thanks Smitty. I tell you what though… I've contemplated more than once buying some scrap linoleum flooring to lay down instead of the canvas tarp. To say sweeping up on that is a pain would be a bit of an understatement…

Maintenance will be in my apartment on Monday to do furnace/air conditioner inspections and change air filters (which means I should put the one they put on it back on… lol I buy my own, better ones for it). Debating if I should hide some of the woodworking stuff, or just say screw it and see what they say lol
 

Attachments

Tool Well and Leg Vise

I've made some progress since the last blog entry, so I suppose I should probably update things here…

I've cut some pine up to make the bottom of my tool well. I may rabbet the ends in the future so they sit just a hair lower, but for now they do the job fine. Didn't take many pictures of progress here, as it was just cutting up a couple pine boards and laying them in the groove and on the shelf.

Image


Image


Image


The main part of of this blog post is the leg vise. I guess I might as well just jump right in with pictures

Some how I managed to not take any pictures of the work in progress with my camera… so all I've got are some phone pictures, unfortunately. And not very many.

Basically, I ripped it to width, cut it to length, and roughly cut it to shape with my circular saw. Then I planed it flat, and planed the shape to be what I wanted.
Image


Image


Yup, horrible at taking pictures sometimes.

Oh well, we continue.

I'm starting to realize how poorly documented this part of the build is…

I made another 1.5" wooden screw, and fellow LJ Mauricio was kind enough to send me an excess 3.5" hub, and also drilled a 1.5" hole in the end. I used it for my leg vise. I think he was right, 3.5" looks much better on the leg vise than 2" would have.

Anywho, I do have good picture coverage of this part. Here I'm working on making the garter plate for the leg vise out of a piece of 3/4" walnut
Image


I drilled a 1" hole with a forstner bit about 3/8" deep. Enough so I could easily get the forstner bit started again with out having to use the spur in the middle. Because I then used a 3.5" hole saw, centering the pilot bit on the cone that the forstner bit spur left. I drilled down about 1/4" (I think it ended up being 3/16, or even 3/8" deep in the end, but oh well)

That established the outside edge, and then I drilled the rest of the way through the 1" hole.

Then it was time to chisel out some of the excess waste

A quick test fit with the hub
Image


A #71 to level out the bottom
Image


And there we have it
Image


Now it's time to cut it off of the rest of the piece of walnut
Image


Image


Image


And cut it in half so I can get it around the screw
Image


And there she is (And yes, the screw placement was intentional based on the grain patterns of the chop. I also cut the chop to size with that as the intended result)
Image


Image


Then, it was time to drill out the back leg, so the leg vise screw could pass through it, so as to not limit my leg vise to a capacity of 5"
Image


Image


Then drilled a hole at the bottom of the leg for the parallel guide
Image


And made another screw (threaded dowel, I suppose) for the parallel guide. I drilled a 1.5" deep hole in the 2" thick vise chop, and then tapped it so I could thread the parallel guide screw in place, and still remove it if I have to.

And here's the parallel guide screw, and the walnut nut
Image


And with that, it was time to give it a test
Image


Image


Also made a 1" oak handle for it. Continuing the theme of "alternating" oak and maple (wagon vise was maple end cap, oak garter plate, maple hub, oak handle. Leg vise is oak chop, maple hub, oak handle)
Image


It does actually close all the way even with the 3/4" thick nut still on it. So that makes me happy, in that I shouldn't have to ever remove it in use, I don't think.
Image


Out of curiosity, this is about as wide open as it'll go with the current parallel guide screw
Image


That'll probably be plenty :)
Image


Image


Thanks for checkin' it out :) This will probably be the last blog of the main bench build. I will hopefully be able to find a time to get some finish on it, but that will have to wait until a time I can do it somewhere other than in my apartment.
Bravo Mos, you did an outstanding job. It came out beautifully.

Thank you for sharing the build with us; it is always a blast to see your work.

I am happy for you man. Congratulations.
 

Attachments

101 - 120 of 128 Posts