LumberJocks Woodworking Forum banner
43K views 47 replies 24 participants last post by  Dorje  
#1 ·
Better Scraper Tuning

Just responded to a post with the following, but thought I'd add it to my blog too:

I finally got great results out of my scrapers - for fine work…

Even though I was honing up to 6000 (waterstones) on the sides and edges of my scrapers, I was burnishing with a HSS round stock turning gouge that seemed pretty hard and smooth to me…(I've been too cheap to buy a "real" burnisher).

Well, it had been tearing the softer steel that I had honed fine, and resulted in a scrappy burnished hook. It worked great, but was about as rough as if I had burnished following the file.

I've since corrected this by buying and using a burnishing rod, which is polished and should be maintained polished. A little camelia oil and the polished burnisher on my newly honed scrapers and wowzers…gossamer shavings, around .001"
 
#4 ·
I just use a file and a burnisher. I did make a file holder from a piece of plywood with a table saw kerf in it. That arrangement works well to joint the edge of laminate as well.
 
#5 ·
In a pinch, rubbing the side of your nose/cheek and then the edge to be burnished provides just enough skin oil to help prevent galling the hook as you burnish. Not as nice as Camelia oil, though.
 
#6 ·
Hello all;

Another thing to make the scraper more user friendly is to place one of those magnetic business cards on the "thumb" side of the scraper when using it.

It will prevent the heat build up from burning your thumbs while using it.

It also provides a little cushion for those of us that are sensitive.

And we all know how women feel about sensitive men.

Or do we?

Lee
 
#10 ·
That's what I'm trying to work toward…no sandpaper; or, if any…start with 220 or 320 and call it good before the finish goes on…then finish the finish.

If you only use the file on the scraper, it works great to peel off shavings, but the surface you get is equivalent to the coarseness of the scraper's edge and of course requires more sanding.

Basically, I have my cabinet scraper set up to do the heavier work and may follow that with the finely honed hand scrapers. I've experimented with honing the cabinet scraper to 6000 and can get a pretty burnished surface on the wood after scraping and rubbing the surface with the shavings.
 
#11 ·
Some of the reading that I've done states that going from scraper to stain is not good. You need the fine scratches for the stain to apply correctly.

But thanks for the tip.
 
#13 ·
I use the scraper to remove the excess or glue squeeze out and then send it through the drum sander. I finish with a once-over with the RO sander to get the track lines out and it is good to go.

I use the card scraper all the time. I use a chisel pulled backwards for the same effect in a more concentrated area. I also use razor blades with a little camber in them for small, fine scraping. I use my hand planes so little that I did not even bring them to Ohio with me.
 
#15 ·
We all have our methods - as a home (small) shop guy - with no drum sander, no plan to get one, no dust collection (plan on setting some kind of dust collection up at some point), I'm looking for ways to cut down on dust and ways to improve and increase my use of hand tools. I don't personally enjoy using a sander, but I do enjoy smoothing surfaces with cutting tools. That said, I'm happy to sand when I need to…
 
#16 ·
One day an old man with a heavy accent came into my Dad's glass shop and asked me for some broken glass. I thought this guy was out of his mind wanting to by broken glass. I gave him some cutoffs from the waste bin and he left. Ten minutes later he came back with a piece of an old violin and asked if he could look through the wastebin for the piece that was just right. By now I'm getting curious and I told him to help himself.
He found a piece and proceeded to scrape the surface of this old violin to something much smoother than any sandpaper was capable of!
I was astonished. This guy was no slouch, you could tell he was a master craftsman by the way he worked the wood. He knew exactly what he wanted and never once broke a piece of scrap glass… Maybe this trick will help some of you? I used a straight cut piece of single strength glass on some Purpleheart that had beautiful grain going in all directions. I finished the job with Watco satin wax and wet sanded it with 320 wet or dry, re-applied another coat and did the same with finer grades of sandpaper until I was satisfied. I still have that frame and it still as smooth as a baby's bottom!
NOTE* single strength glass seems to work the best for scraping/smoothing. I recommend gloves too!
Chuck
 
#19 ·
Learning to Sharpen Saws

I've been wanting to add a few saws to the "toolbox." And, rather than spend a bunch of dough, I thought that I'd try to refurbish some used backsaws. Though I will more than likely purchase a couple older Disston or other manufacturer tenon saws, in the 12" range, I though I'd try my hand at learning to sharpen on a couple 10" backsaws with turned handles that I already have.

The only functional western style backsaw I own (aside from a flush cut saw) is a Garlick and Sons 8" dovetail saw with a turned handle and 19 teeth per inch (TPI). It's comfortable and cuts well. I discovered it has a little bit more set than it should (.010" overall set; should be .004-008" overall), so will adjust that after I gain skill with the following saws, though it just takes honing the sides of the teeth to lessen the set and it's not over by much. I cut these with the G&S saw sharpened from the factory:

Image


Here's what its teeth look like up close:

Image


There are just so many of them! I've been doing A LOT of reading about saws and saw sharpening lately and I believe the consensus of authors on the topic is that there is no need for a 20 TPI (or thereabouts). Most authors state that 10-15 is about right. One advocated filing away every other tooth on a saw in the 20-26 TPI range. By the way, the Lie Nielsen dovetail saw has 15 TPI…sounds about right.

This Two Cherries saw is in dire shape. It was given to me by an acquaintance and it has never been able to cut. Literally. It roughs up wood pretty good though. I had it stored away waiting for the day that I would learn to sharpen my saws. That day has come.

Image


Its got 13 TPI and the shape is just dead wrong for a RIP saw. See the G&S teeth above to get the idea for what a rip saw shape should be like. This shape is closer to a crosscut (CC) shape, but filed incorrectly (if filed at all). This saw had overall set of .022". The teeth might as well have been sideways! My hunch is that this saw's teeth were stamped at the factory and machine set (or all was done in one procedure?). I plan to correct the shape and file this as a RIP saw, that can be used for dovetails or as a small carcase/tenon saw. This saw, although tagged with the Two Cherries label, is the same saw that Chris Gochnour sharpened in his article and video at FWW. However, the saw he reviewed and sharpened was a Deer brand. Bottom line: just a $10-15 saw. Perfect for learning on. Here's what the teeth look like up close:

Image


This other saw, I'm calling a Stanley, as it came out of a little miter jig that I bought for a buck or so at a tool swap. It actually cuts second best to the G&S. It has 15 TPI and will probably stay that way. It is filed RIP at this point and has about .012" of overall set. I plan to file this as a CC saw and reduce its set.

Image


Here's what its teeth look like:

Image


To start on the Two Cherries saw, I first took the set out by hammering it out gently on the anvil of a small vise:

Image


It's important to use a hammer with a convex face, and the Warrington pattern hammer fits the bill. A ball peen would have worked well too, but this one is always on the bench.

I made a saw jointer out of a scrap piece of fir and jointed the teeth to a small consistent flat on the top of every tooth with an 8" mill bastard:

Image


If you look close you can see the jointed teeth toward the right side in the photo of the saw. You can only see the area that is reflective, but all teeth are equally flat:

Image


Next up, I used a 5" double extra slim taper saw file to just barely start to shape the teeth. I've been stealing away time and have literally only had a minute here and a minute there to work on this, so bear with me!

The file (it's a little guy):

Image


The few (8-9) teeth that I started to roughly reshape, can be seen on the left hand side:

Image


After these teeth are reshaped, I'll set them, do another light jointing, and do the final sharpening from both sides.

Along with the saw jointer block I was able to muster up a Tage Frid style saw vise. It's hinged at the bottom and the hard maple jaws are tapered so that it's tight up high - where it counts. It seems to work well. This is really where all my spare minutes went. But, I had to have it before moving on!

Image
 
#38 ·
Saw Sharpening Pt.2

Got back out to the shop and made the little guide blocks as seen in the Vintage Saws site tutorial.

Image


Image


The use of the blocks really did help to maintain the rake angle and give you something to hold on to when filing. I continued to file all the teeth from one side until they all had a uniform shape.

Image


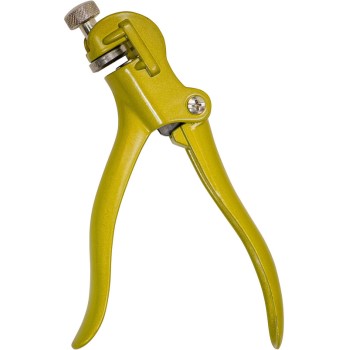
After the teeth were shaped, I set them using a standard set with a range of 4-12 TPI settings. I used a set similar to this one:

Image


I jointed lightly once again and filed the teeth lightly from both sides this time (alternating every tooth). It's important to file the teeth that are set away from you. I ended up using two passes on each side to remove the flats and file the teeth to sharp points that do not reflect light on the cutting edge. Here's what I ended up with:

Image


Image


I'm pretty pleased. Remember what the teeth looked like originally? Here you go:

Image


I was able to take a saw that literally could not cut, and sharpen it to a real decent cutting saw that cuts straight (or as straight as I can cut) and fits snug in the kerf without binding:

Image


Image


A little more technical info:

The saw blade is .020" thick and it now has an overall set of .006" or .003" per side, achieved by systematically honing the sides of the teeth to reduce the set. I think it took 3-4 passes per side with a coarse diamond hone. After setting the teeth, the saw had an overall set of .012" (with the saw set on it's finest setting). Even that would be a lot better than the original .022" of set the saw came with, which would make the kerf .042" or twice as thick as the blade!

This saw with 13 TPI filed RIP with an 8 degree rake angle cuts fast and clean.

Next, I'll tune the crosscut saw…